SOCKS5 — самый скучный и самый живучий способ отдать одному приложению чужой IP. Он не шифрует трафик, не поднимает интерфейс, не требует прав root у клиента и понимается всем: браузером через расширение, curl, git, Telegram, Python-скриптом, любым sing-box или Xray в роли исходящего. Когда нужно «сходить откуда-то ещё» из конкретной программы, а не завернуть весь ноутбук в туннель, SOCKS5 обычно оказывается правильным инструментом.
Задача одна, а реализаций на голом сервере — три, и они принципиально разные. Ниже — все три, с конфигами построчно, аутентификацией, systemd-юнитами и проверкой на утечку DNS. Плюс отдельный разговор о том, почему прокси без пароля перестаёт быть вашим примерно за сутки.
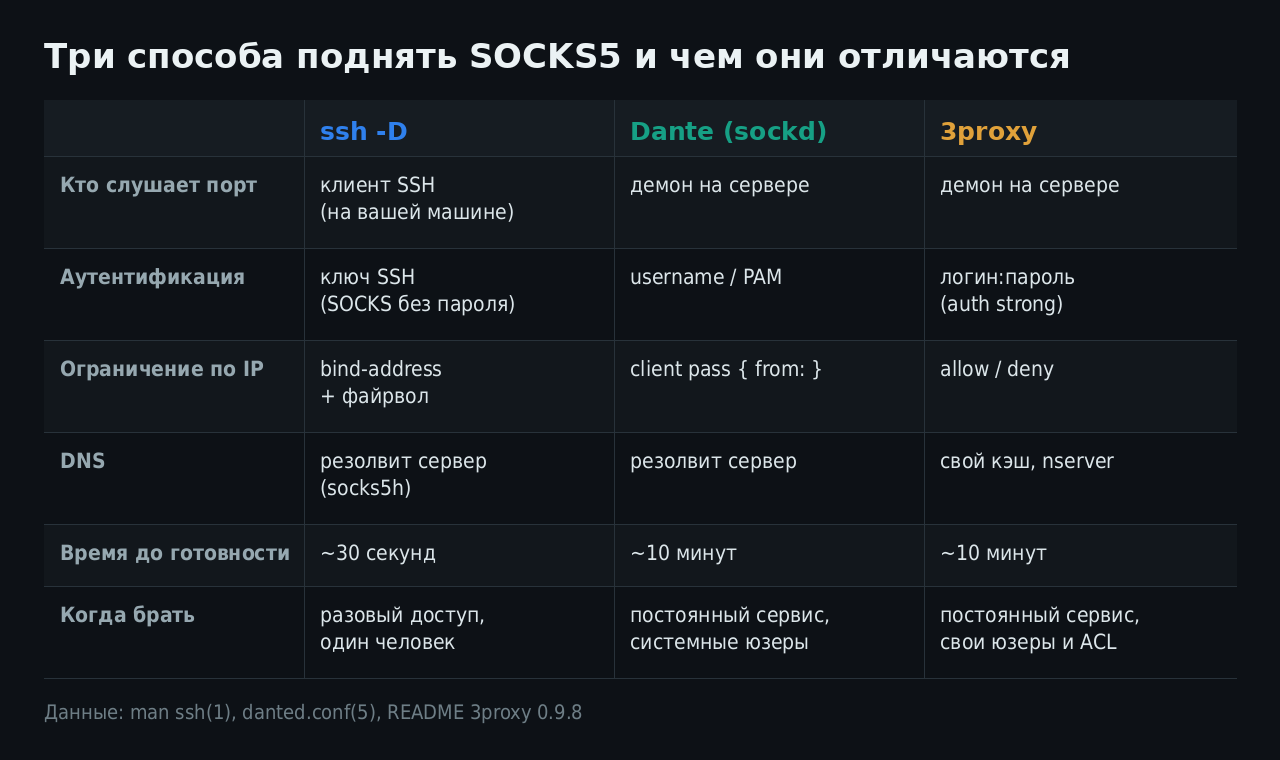
Схема на основе man ssh(1), danted.conf(5) и README 3proxy
Кому это нужно. Есть VPS в нужной стране и SSH-доступ к нему. Хочется, чтобы отдельные программы ходили в сеть через него — без VPN на всю машину, без изменения маршрутов, без прав администратора на клиенте. Всё остальное — детали реализации.
Вариант 1. ssh -D: тридцать секунд и ни одного конфига
Клиент OpenSSH умеет быть SOCKS-сервером сам. Man-страница формулирует это прямо: «Specifies a local “dynamic” application-level port forwarding… Currently the SOCKS4 and SOCKS5 protocols are supported, and ssh will act as a SOCKS server».
Ключевой момент, который часто понимают наоборот: порт слушает ваша локальная машина, а не сервер. Сервер только выполняет исходящие соединения. Никакого демона на VPS ставить не надо — там достаточно обычного sshd.
ssh -D 127.0.0.1:1080 -N -C user@vps.example.com
Разбор:
| Флаг | Что делает |
|---|---|
-D 127.0.0.1:1080 |
поднять SOCKS-сервер на локальном порту 1080, слушать только петлю |
-N |
«Do not execute a remote command» — не запускать шелл, только форвардинг |
-C |
сжатие всего трафика соединения; полезно на узком канале, вредно на быстром |
-f |
уйти в фон (для ручного запуска; для systemd не нужен) |
Адрес в -D писать обязательно. ssh -D 1080 в большинстве сборок слушает только localhost, но поведение зависит от GatewayPorts и параметров сборки — и в момент, когда вы решите «пусть с ноутбука жены тоже ходит» и добавите -D 0.0.0.0:1080, у вас появится SOCKS-прокси без единого пароля, доступный всей локальной сети. Для доступа с других машин правильнее прокинуть порт ещё раз, а не открывать его.
Чтобы туннель не умирал
Голый ssh -D разваливается от любого обрыва. Лечится двумя способами, и они дополняют друг друга.
Первый — заставить сам SSH замечать, что связи нет. Второй — перезапускать процесс. Man autossh(1) прямо рекомендует первый: «you may wish to explore using the ServerAliveInterval and ServerAliveCountMax options to have the SSH client exit if it finds itself no longer connected to the server. In many ways this may be a better solution than the monitoring port».
Поэтому в связке с autossh мониторинговый порт отключают (-M 0 — «Setting the monitor port to 0 turns the monitoring function off, and autossh will only restart ssh upon ssh’s exit»), а живучесть вешают на keepalive:
# /etc/systemd/system/socks-tunnel.service
[Unit]
Description=SOCKS5 через SSH к vps.example.com
After=network-online.target
Wants=network-online.target

[Service]
User=proxyuser
Environment=AUTOSSH_GATETIME=0
ExecStart=/usr/bin/autossh -M 0 -N -T \
  -o "ServerAliveInterval=15" \
  -o "ServerAliveCountMax=3" \
  -o "ExitOnForwardFailure=yes" \
  -o "StrictHostKeyChecking=yes" \
  -i /home/proxyuser/.ssh/id_ed25519 \
  -D 127.0.0.1:1080 user@vps.example.com
Restart=always
RestartSec=10

[Install]
WantedBy=multi-user.target
AUTOSSH_GATETIME=0 здесь не косметика: по умолчанию autossh считает соединение успешным только после 30 секунд жизни, а с нулём ещё и игнорирует провал первого запуска — то, что нужно при старте системы, когда сеть могла подняться на секунду позже.
ExitOnForwardFailure=yes — тоже не мелочь. Без него ssh спокойно поднимет соединение, на котором порт 1080 занят кем-то другим, и вы будете долго гадать, почему прокси «работает», но ходит не туда.
Когда этого хватает. Один пользователь, один ноутбук, доступ по SSH-ключу уже настроен. Аутентификация в SOCKS не нужна вовсе: чтобы воспользоваться прокси, надо иметь доступ к localhost вашей машины, а он и так есть только у вас. Это самая безопасная конфигурация из трёх — просто потому, что снаружи ничего не слушает.
Вариант 2. Dante: демон, который знает про системных пользователей
Dante (sockd) — эталонная реализация SOCKS от Inferno Nettverk. Текущая версия — 1.4.4; в Debian 13 и Ubuntu пакет называется dante-server, конфиг лежит в /etc/danted.conf (upstream по умолчанию использует /etc/sockd.conf — не путайтесь при чтении официальной документации).
apt update && apt install -y dante-server
Минимальный рабочий конфиг с паролем и ограничением по подсети:
# /etc/danted.conf

logoutput: /var/log/danted.log

# на каком адресе слушаем клиентов
internal: 0.0.0.0 port = 1080
# с какого интерфейса уходим наружу
external: eth0

# от чьего имени работать после старта
user.privileged: root
user.notprivileged: nobody

# метод аутентификации клиента SOCKS
socksmethod: username

# ── правила уровня «кому вообще можно подключиться»
client pass {
    from: 0.0.0.0/0 to: 0.0.0.0/0
    log: error connect disconnect
}

# ── правила уровня «что можно делать внутри сессии»
socks pass {
    from: 0.0.0.0/0 to: 0.0.0.0/0
    command: connect
    socksmethod: username
    user: socksuser
    log: error connect
}
Два уровня правил — главная особенность Dante, и на ней спотыкаются чаще всего. client решает, принимать ли TCP-соединение вообще. socks решает, что разрешено делать уже внутри установленной SOCKS-сессии. Пропустили socks pass — клиент подключится и получит отказ на первый же запрос.
Значения, которые стоит знать по имени:
| Директива | Допустимые значения (по danted.conf(5)) |
|---|---|
socksmethod |
none, username, gssapi, pam.any, pam.address, pam.username, rfc931, bsdauth |
command |
bind, connect, udpassociate, bindreply, udpreply |
log |
connect, disconnect, data, error, ioop, tcpinfo |
logoutput |
syslog[/facility], stdout, stderr, имя файла или их комбинация |
external.rotation |
none (по умолчанию), route, same-same |
socksmethod: username означает проверку по системной базе пользователей. Заводим пользователя, которому нечего делать в системе:
useradd -r -s /usr/sbin/nologin socksuser
passwd socksuser
Не оставляйте socksmethod: none в конфиге, который слушает 0.0.0.0. Это ровно та конфигурация, которую сканеры находят быстрее всего: открытый SOCKS5 на 1080 порту — стандартная цель массовых сканов. Если аутентификация мешает (например, клиент её не умеет), закрывайте доступ на уровне client pass { from: } и файрвола — но не оставляйте открытым и то, и другое.
Ограничение по источнику пишется прямо в правиле:
client pass {
    from: 203.0.113.10/32 to: 0.0.0.0/0
    log: error connect
}
client block {
    from: 0.0.0.0/0 to: 0.0.0.0/0
    log: connect error
}
Порядок важен: правила проверяются сверху вниз, первое совпавшее выигрывает. Явный block в конце — хорошая привычка, даже если поведение по умолчанию и так «запретить».
Запуск и проверка:
systemctl enable --now danted
systemctl status danted
tail -f /var/log/danted.log
Вариант 3. 3proxy: свои пользователи и ACL без системных учёток
3proxy — один бинарник на C, живущий с начала двухтысячных. Последний релиз — 0.9.8 от 7 августа 2024 года; в нём, помимо прочего, появился IMAPv4-прокси и поддержка STARTTLS. Собирается из исходников или ставится готовым deb/rpm из релизов на GitHub.
# сборка из исходников
git clone https://github.com/3proxy/3proxy
cd 3proxy
ln -s Makefile.Linux Makefile
make
make install
Конфиг — последовательный, а не декларативный: директивы применяются по мере чтения файла, и порядок строк меняет смысл.
# /etc/3proxy/3proxy.cfg

# ── DNS: свои резолверы и кэш, чтобы не дёргать систему на каждый запрос
nserver 1.1.1.1
nserver 9.9.9.9
nscache 65536

# ── логи с ежедневной ротацией, flush после каждой записи
log /var/log/3proxy/3proxy.log D
logformat "- +_L%t.%. %N.%p %E %U %C:%c %R:%r %O %I %h %T"
rotate 30

# ── от кого работать после старта (числовые uid/gid своего пользователя)
setgid 65534
setuid 65534

# ── лимиты
maxconn 200

# ── пользователи: логин:тип_пароля:пароль
users socksuser:CL:StrongPassHere

# ── аутентификация: strong = обязательный логин/пароль
auth strong

# ── ACL: разрешаем только известному пользователю с известной подсети
allow socksuser 203.0.113.0/24
deny *

# ── и только теперь поднимаем сервис
socks -p1080 -i0.0.0.0 -e198.51.100.7
Что здесь важно понимать:
auth strongтребует логин и пароль. Есть ещёauth none(без проверки) иauth iponly(только по IP) — и первое в сочетании с-i0.0.0.0даёт открытый прокси.allow/denyидут послеauthи доsocks. Строкаsocks— это точка, где сервис начинает слушать; всё, что вы объявите после неё, к этому сервису уже не применится.-i— адрес, на котором слушаем;-e— адрес, с которого уходим наружу. На сервере с несколькими IP-eрешает, каким адресом вы «светите».CLв строкеusersозначает пароль открытым текстом. Для продакшена лучшеCR(crypt) — тогда в конфиге лежит хеш:users socksuser:CR:$1$....
Порты по умолчанию у 3proxy: SOCKS — 1080, HTTP-прокси — 3128, FTP — 21, POP3 — 110, SMTP — 25. Если в конфиге не указать -p, поднимется 1080. Это же значение по умолчанию у Dante и у большинства образов — то есть первое, что просканируют.
systemd-юнит:
# /etc/systemd/system/3proxy.service
[Unit]
Description=3proxy tiny proxy server
After=network-online.target
Wants=network-online.target

[Service]
Type=simple
ExecStart=/usr/local/bin/3proxy /etc/3proxy/3proxy.cfg
ExecReload=/bin/kill -SIGUSR1 $MAINPID
Restart=on-failure
RestartSec=5
LimitNOFILE=65536
NoNewPrivileges=true
ProtectSystem=strict
ProtectHome=true
PrivateTmp=true
ReadWritePaths=/var/log/3proxy

[Install]
WantedBy=multi-user.target
SIGUSR1 — штатный сигнал перечитывания конфига, перезапуск не нужен. Директивы ProtectSystem/NoNewPrivileges стоят бесплатно и заметно сужают последствия, если в прокси когда-нибудь найдут дыру.
Файрвол: не один рубеж, а три
Правило прокси и правило файрвола решают разные задачи, и заменять одно другим — плохая идея.
# nftables: пускаем на 1080 только известную подсеть
nft add rule inet filter input tcp dport 1080 ip saddr 203.0.113.0/24 accept
nft add rule inet filter input tcp dport 1080 drop
# ufw — то же самое
ufw allow from 203.0.113.0/24 to any port 1080 proto tcp
ufw deny 1080/tcp
Почему открытый прокси — проблема именно владельца сервера. Через ваш SOCKS5 наружу уходят чужие соединения с вашего IP. Спам, брутфорс чужих панелей, сканирование, посещение того, за что придёт abuse-жалоба, — в логах пострадавшей стороны будет ваш адрес. Хостер получает жалобу и, в лучшем случае, просит объясниться; в худшем — блокирует машину без предупреждения. Плюс канал и лимит трафика: 1080-й порт без пароля находят массовые сканеры, и «бесплатный» прокси очень быстро становится популярным.
Минимальный набор, который стоит считать обязательным:
- Аутентификация всегда, даже «на пару часов для теста».
- Ограничение по IP там, где источник известен, — на уровне и прокси, и файрвола.
- Логи с датой, IP и пользователем, и хотя бы раз в неделю — взгляд в них.
- Нестандартный порт как косметика поверх пунктов 1–3, а не вместо них.
Проверка: пять команд и одна ловушка с DNS
# 1. Порт вообще слушает и кем?
ss -tlnp | grep 1080

# 2. Простейшая проверка без авторизации
curl -x socks5h://127.0.0.1:1080 https://ifconfig.co

# 3. С логином и паролем
curl -x socks5h://socksuser:StrongPassHere@vps.example.com:1080 https://ifconfig.co

# 4. То же самое отдельными флагами
curl --socks5-hostname vps.example.com:1080 -U socksuser:StrongPassHere https://ifconfig.co

# 5. Убедиться, что снаружи порт закрыт (запускать с ДРУГОЙ машины)
nc -vz vps.example.com 1080
Теперь про ловушку. У curl есть два очень похожих флага, и разница между ними — это разница между «провайдер видит ваши домены» и «не видит».
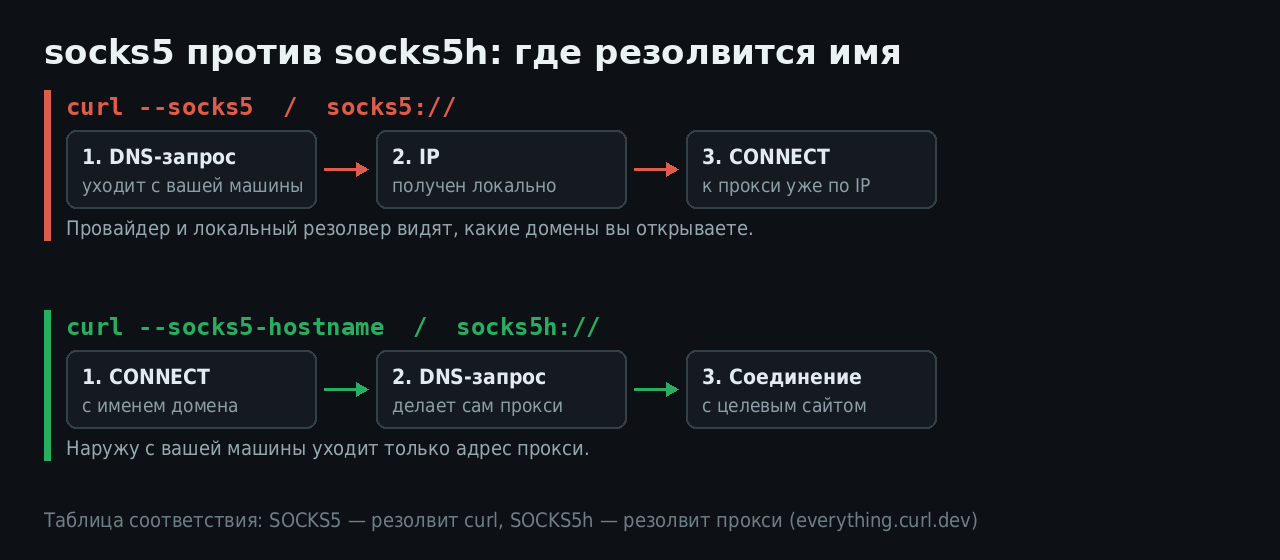
Схема на основе таблицы схем прокси из everything.curl.dev
Официальная документация curl приводит таблицу без двусмысленностей: для SOCKS 5 имя резолвит сам curl, для SOCKS 5h — прокси. Соответственно:
--socks5и схемаsocks5://— DNS-запрос уходит с вашей машины. Соединение к сайту идёт через прокси, но кто именно вы открываете — знает ваш резолвер и все, кто видит его трафик.--socks5-hostnameи схемаsocks5h://— curl отдаёт прокси само имя домена, и резолвит его сервер.
Если прокси нужен для обхода DNS-фильтрации или просто чтобы не отдавать список посещённых доменов локальному резолверу — используйте только socks5h:// (или --socks5-hostname). Схема socks5:// в этом сценарии бесполезна: адрес вы получите тот же самый подменённый, и уйдёте по нему через прокси.
То же самое касается настроек в клиентах: в Firefox нужен включённый «Proxy DNS when using SOCKS v5», в sing-box и Xray у исходящего типа socks за это отвечает поле, отдающее домен вместо IP.
Проверить, куда реально ушёл DNS, проще всего на самом сервере: запустите tcpdump -i any port 53 на прокси и сделайте один запрос с клиента. Видите запрос — резолвит сервер, всё правильно. Не видите — резолвит клиент, и вы, скорее всего, забыли букву h.
Что выбрать в итоге
Если доступ нужен вам одному и SSH-ключ уже настроен — берите ssh -D с autossh. Это единственный вариант, при котором на сервере не появляется нового слушающего порта, а значит, и новой поверхности атаки.
Если прокси нужен как постоянный сервис для нескольких человек и вы уже держите системных пользователей — Dante, у него самая внятная модель правил и подробные логи.
Если хочется своих пользователей отдельно от системных, гибких ACL по времени и подсетям, а заодно HTTP-прокси на том же демоне — 3proxy.
Общее для всех трёх: пароль обязателен, доступ по IP ограничен, логи читаются. Прокси, который вы подняли «на вечер попробовать» и забыли, живёт годами — и всё это время отвечает вашим IP-адресом.
Смежные темы на форуме: WARP-cli на Linux-сервере в режиме прокси и Серый IP и CGNAT: пять маршрутов к домашнему серверу.
Источники
- man ssh(1), OpenBSD — описание
-D,-N,-C - man autossh(1), Debian —
-M 0,AUTOSSH_GATETIME, рекомендация по ServerAliveInterval - Dante: документация по конфигурации и текущий статус проекта — версия 1.4.4
- man danted.conf(5), Debian — значения
socksmethod,log,logoutput - 3proxy на GitHub и список релизов — версия 0.9.8 от 07.08.2024
- everything.curl.dev: SOCKS — таблица «кто резолвит имя»
А чем пользуетесь вы и почему? Отдельно интересно про Dante: кто-нибудь довёл до рабочего состояния pam.username вместо простого username — и стоило ли оно возни с PAM-стеком?