Сценарий знакомый до боли. Подняли дома Jellyfin или Immich, прокинули порт на роутере, набрали свой адрес с телефона по мобильному интернету — тишина. Проброс перепроверен трижды, файрвол выключен, сервер отвечает изнутри сети идеально. А снаружи — ничего.
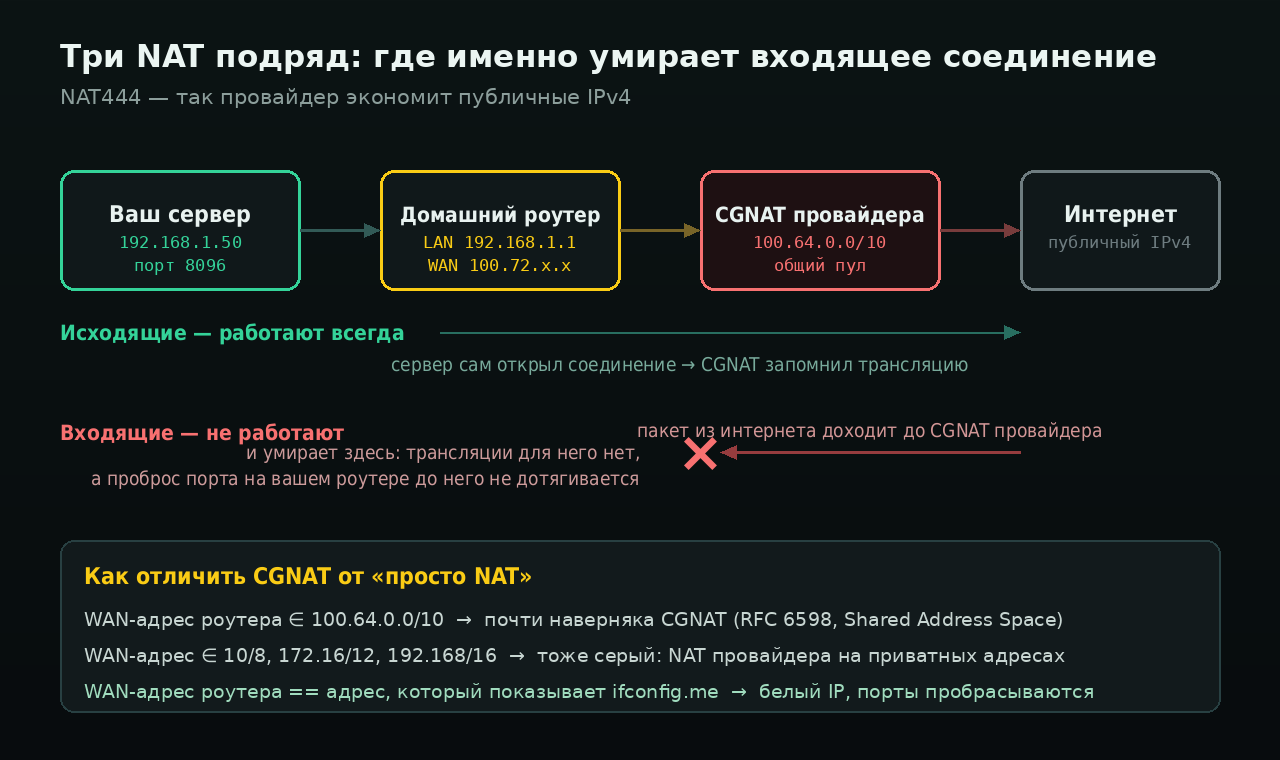
Почти всегда это CGNAT. Провайдер не выдал вам публичный адрес, а посадил за общий трансляционный узел вместе с сотней соседей. Хорошая новость: обойти это можно пятью разными способами, и три из них бесплатны. Плохая: у каждого своя цена, и выбирать надо осознанно, потому что переделывать потом больно.
Разберём по порядку: сначала диагностика, потом все пять маршрутов с честными ограничениями, в конце — матрица выбора и грабли.
Часть 1. Пять минут диагностики
Проверка первая: что видит роутер
Зайдите в веб-интерфейс роутера и посмотрите WAN-адрес. Затем откройте на любом устройстве этой же сети ifconfig.me или аналог и посмотрите адрес, которым вас видит интернет.
- Адреса совпадают → у вас белый IP. Проблема не в CGNAT, ищите ошибку в пробросе или в файрволе на самом сервере.
- Адрес роутера начинается со
100.64–100.127→ это Shared Address Space. Почти наверняка CGNAT. - Адрес роутера из
10.х.х.х,172.16–31.х.х,192.168.х.х→ тоже серый: провайдер делает NAT на приватных адресах.
Диапазон 100.64.0.0/10 выделен RFC 6598 именно под Carrier-Grade NAT — для нумерации стыков между узлом CGN провайдера и оборудованием абонента. Там же прямо сказано: пакеты с такими адресами не должны пересекать границы сетей операторов, и такие адреса не должны попадать во внешние зоны DNS. То есть это по определению не то, до чего можно достучаться извне.
Проверка вторая: traceroute
Запустите с домашней машины traceroute 8.8.8.8 (или tracert в Windows). Если первым хопом идёт ваш роутер, вторым — адрес из 100.64/10 или приватный, и только третьим появляется что-то публичное, это подтверждение: между вами и интернетом стоит ещё один NAT. Классический NAT444.
Проверка третья: спросить провайдера
Самый недооценённый шаг. Формулировка для техподдержки: «Мне нужен выделенный публичный IPv4-адрес, услуга белого IP. Также уточните, выдаётся ли на моём тарифе IPv6». Второй вопрос важнее первого — к нему вернёмся.
Отдельно проверьте IPv6 прямо сейчас: откройте test-ipv6.com или выполните curl -6 https://ifconfig.co. Если ответ есть — у вас может не быть проблемы вообще, просто вы её решали не в том протоколе.
Часть 2. Что именно ломается
Полезно понимать масштаб, потому что CGNAT ломает не только проброс портов. RFC 6598 честно перечисляет издержки NAT444: не работают консольные игры, деградирует видеосвязь, ломается p2p, врёт геолокация. К этому добавьте:
- Проброс портов физически невозможен. На вашем роутере он настроится и даже покажет «активно», но входящий пакет до роутера просто не дойдёт.
- DDNS бессмысленен. Он обновит A-запись на адрес, который вы делите с сотней абонентов.
- UPnP и NAT-PMP не спасают. Они договариваются с вашим роутером, а не с оборудованием провайдера.
- Внешние капчи и баны прилетают за соседей. Один шумный сосед по трансляции — и вы ловите проверки Cloudflare на ровном месте.
Все пять маршрутов ниже строятся на одном и том же принципе: раз входящее соединение до вас не доходит, соединение должен инициировать дом. Наружу CGNAT пропускает всё. Различаются маршруты только тем, кто выступает точкой встречи и во что вам это обходится.
Часть 3. Маршрут 1 — попросить белый IP
Самое скучное решение и самое недооценённое.
Услуга «выделенный/статический IP» есть почти у всех проводных провайдеров. По российскому рынку это обычно порядка 100–200 ₽/мес, но цифру уточняйте у своего — тарифы меняются, и приводить их как факт я не буду.
Когда брать: если дома нормальный аплинк, вы хотите Jellyfin с прямой раздачей 4K, играете по сети или хостите что-то, где важна задержка и полоса. Ни один туннель не даст лучше, чем прямое соединение.
Когда не брать: мобильный интернет как основной канал (белый IP там обычно не продают или продают дорого), либо вас не устраивает светить домашний адрес наружу.
Белый IP означает, что ваш домашний сервер теперь напрямую доступен всему интернету, включая сканеры. Через час после подключения в логах будут попытки перебора SSH. Порт 22 наружу не открывать, аутентификация только по ключам, всё остальное — за реверс-прокси с TLS.
Часть 4. Маршрут 2 — IPv6
Если провайдер выдаёт IPv6, у вас нет проблемы CGNAT: адресов хватает всем, и каждое устройство в доме получает глобально маршрутизируемый адрес. NAT в IPv6 не нужен.
Что нужно сделать:
- Убедиться, что роутер получает префикс (обычно /64 или /56) и раздаёт его в LAN.
- Разрешить входящие на нужный порт в файрволе роутера. Это не проброс — трансляции нет, адрес у сервера уже глобальный. Но stateful-файрвол по умолчанию режет входящие, и это правильно.
- Настроить DDNS с AAAA-записью: префикс у домашних абонентов часто динамический.
Главное ограничение IPv6 — не у вас, а у клиента. Если вы в кафе или в роуминге на сети, где IPv6 нет, до вашего IPv6-адреса вы не доедете. На практике IPv6 работает как «основной путь плюс запасной вариант», а не как единственное решение. Держите в кармане второй маршрут из этого списка.
Часть 5. Маршрут 3 — overlay-сеть
Tailscale, NetBird, ZeroTier, самохостимый Headscale. Идея одна: все ваши устройства поднимают исходящие соединения к координирующему серверу, тот помогает им найти друг друга и по возможности установить прямой p2p-канал (техника NAT traversal), а если не выходит — трафик идёт через ретранслятор.
Это самый быстрый способ получить рабочий результат: установка на обе стороны занимает минут пять, править роутер не нужно вообще.
Тарифы Tailscale на момент написания: план Personal — бесплатно, до 6 пользователей, неограниченное число пользовательских устройств, 50 тегированных ресурсов и до 3 групп ACL. Платные — Standard $8 и Premium $18 за пользователя в месяц. Цифры берутся со страницы тарифов и, разумеется, могут поменяться.
Когда overlay — правильный выбор: доступ нужен вам и вашим людям, а не публике. Домашний Home Assistant с телефона, SSH к серверу, Immich для семьи, доступ к NAS из отпуска. Классические задачи, где не нужен публичный адрес вовсе.
Обратная сторона: координирующий сервер знает топологию вашей сети и участвует в обмене ключами. У Tailscale трафик шифруется end-to-end через WireGuard и через их серверы в открытом виде не ходит, но метаданные — какие устройства, когда онлайн, кто с кем связывается — проходят через инфраструктуру компании. Если это неприемлемо, есть Headscale — открытая реализация координирующего сервера, которую вы поднимаете сами. Клиенты при этом остаются официальные.
Когда overlay не подходит: если нужен именно публичный доступ. Раздать ссылку на свой блог или на страницу через Tailscale не получится — на той стороне нужен клиент и авторизация.
Часть 6. Маршрут 4 — Cloudflare Tunnel и его потолок
cloudflared поднимает исходящее соединение из вашей сети к Cloudflare, после чего домен, обслуживаемый Cloudflare, начинает отдавать ваш локальный сервис. Публичный адрес не нужен, порты открывать не нужно, TLS-сертификат берётся автоматически. Поддерживаются HTTP, SSH, RDP.
Звучит идеально, и для сайтов, панелей и API — действительно очень хорошо. Но у решения есть два жёстких потолка, о которых узнают обычно уже после переезда.
Потолок первый: видео запрещено правилами. Cloudflare формулирует это без двусмысленностей: «С самого начала мы запрещали стриминг видеоконтента с использованием нашей полосы». Ограничение действует на планах Free, Pro и Business; легальный способ раздавать видео — Cloudflare Stream. И там же предупреждение, что при нарушении контент могут перенаправить «или предпринять иные действия для защиты качества сервиса».
Jellyfin, Plex, Emby или Immich с видеотеками через Cloudflare Tunnel на бесплатном плане — это прямое нарушение правил Cloudflare, а не «серая зона». Работать оно будет ровно до того момента, пока не заметят. Для медиасервера берите любой другой маршрут из этой статьи.
Потолок второй: размер загружаемого файла. Максимальный размер тела запроса через проксирование Cloudflare — 100 МБ на планах Free и Pro, 200 МБ на Business, 500 МБ по умолчанию на Enterprise. Превышение возвращает 413 Request entity too large. Для Nextcloud, Immich и любого сервиса, куда вы заливаете большие файлы, это приговор — фотографии с телефона пролезут, видео с дрона нет.
Что остаётся в плюсе: домашний адрес полностью скрыт, DDoS-защита в комплекте, есть Cloudflare Access для авторизации перед приложением. На форуме уже есть практические разборы — настройка Cloudflare Tunnel и связка с Remnawave через Docker Compose.
Часть 7. Маршрут 5 — свой VPS-релей
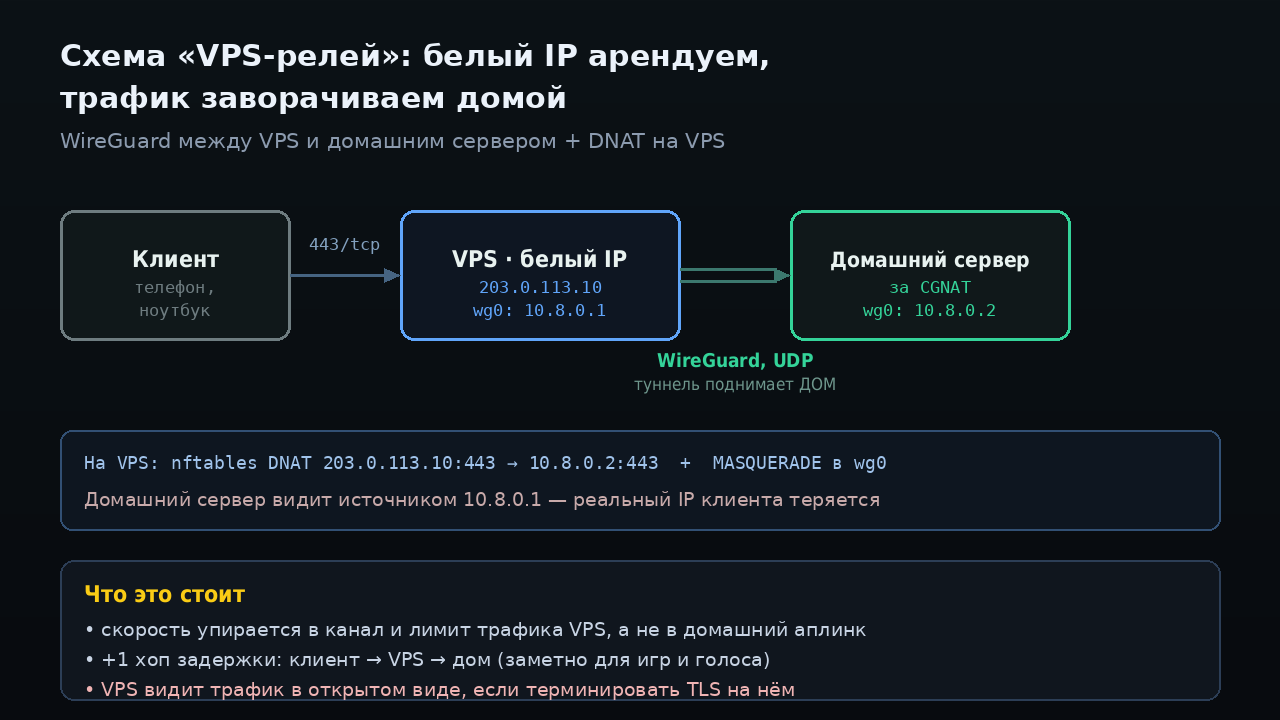
Самый гибкий вариант: арендуем самый дешёвый VPS ради его белого IP, поднимаем WireGuard между VPS и домашним сервером, и на VPS заворачиваем нужные порты в туннель.
Шаг 1. Ключи
На обеих сторонах:
wg genkey | tee privatekey | wg pubkey > publickey
Шаг 2. Конфиг на VPS
/etc/wireguard/wg0.conf:
[Interface]
Address = 10.8.0.1/24
ListenPort = 51820
PrivateKey = <приватный_ключ_VPS>

[Peer]
# домашний сервер
PublicKey = <публичный_ключ_дома>
AllowedIPs = 10.8.0.2/32
Endpoint у пира не указан намеренно: адрес дома неизвестен и меняется, соединение всегда инициирует дом.
Шаг 3. Конфиг дома
[Interface]
Address = 10.8.0.2/24
PrivateKey = <приватный_ключ_дома>

[Peer]
PublicKey = <публичный_ключ_VPS>
Endpoint = 203.0.113.10:51820
AllowedIPs = 10.8.0.0/24
PersistentKeepalive = 25
PersistentKeepalive = 25 на домашней стороне — не опция, а обязательное условие. Без него запись о трансляции в CGNAT провайдера протухает за минуту-две простоя, и туннель отваливается до следующего исходящего пакета. Симптом: «всё работает, пока я активно пользуюсь, а утром недоступно».
Поднимаем на обеих сторонах: wg-quick up wg0, автозапуск — systemctl enable wg-quick@wg0. Проверка — wg show и ping 10.8.0.2 с VPS.
Шаг 4. Прокидываем порт на VPS
Включаем форвардинг:
echo 'net.ipv4.ip_forward = 1' > /etc/sysctl.d/99-forward.conf
sysctl --system
Правила nftables:
table ip nat {
    chain prerouting {
        type nat hook prerouting priority dstnat;
        iifname "eth0" tcp dport 443 dnat to 10.8.0.2:443
    }
    chain postrouting {
        type nat hook postrouting priority srcnat;
        oifname "wg0" masquerade
    }
}
Работает — но с неприятным побочным эффектом: из-за masquerade домашний сервер видит источником 10.8.0.1, и реальный IP клиента теряется. Все ограничения по IP, geo-правила и fail2ban на домашней стороне становятся бесполезны.
Шаг 5 (лучше): nginx stream вместо DNAT
Если сервис за HTTPS, вместо чистого DNAT используйте на VPS nginx в режиме stream с PROXY protocol:
stream {
    server {
        listen 443;
        proxy_pass 10.8.0.2:8443;
        proxy_protocol on;
    }
}
А на домашнем nginx:
server {
    listen 8443 ssl proxy_protocol;
    set_real_ip_from 10.8.0.1;
    real_ip_header proxy_protocol;
    # ...
}
Так реальный адрес клиента доезжает до приложения, а TLS по-прежнему терминируется дома — VPS видит только шифрованный поток. Это важно: при терминации TLS на VPS весь трафик проходит через арендованную машину в открытом виде.
Готовые обёртки над этой же схемой существуют, если не хочется собирать руками: Pangolin (разбор есть на форуме), rathole, frp. Логика та же — агент дома, релей на белом IP, — отличаются удобством и наличием веб-панели.
Часть 8. Матрица выбора
| Публичный доступ | Видео/большие файлы | Скрывает домашний IP | Задержка | Цена | |
|---|---|---|---|---|---|
| Белый IP | да | без ограничений | нет | минимальная | ~100–200 ₽/мес |
| IPv6 | да, но только для IPv6-клиентов | без ограничений | нет | минимальная | 0 |
| Overlay (Tailscale) | нет, только для своих | ограничено ретранслятором | да | средняя | 0 до 6 польз. |
| Cloudflare Tunnel | да | видео запрещено, аплоад ≤100 МБ | да | средняя | 0 |
| VPS-релей | да | упирается в лимиты VPS | да | +1 хоп | от ~200 ₽/мес |
Короткие рекомендации по типовым задачам:
- Медиасервер для себя и семьи → белый IP, если дают; иначе VPS-релей. Cloudflare Tunnel отпадает по правилам.
- Home Assistant с телефона → overlay. Самый простой и самый безопасный вариант, публичный адрес тут просто не нужен.
- Сайт, блог, панель, API → Cloudflare Tunnel. Быстро, бесплатно, с защитой в комплекте.
- Immich или Nextcloud с загрузкой видео → VPS-релей или белый IP: лимит в 100 МБ убивает Cloudflare.
- Максимум приватности → Headscale на своём VPS: и координатор, и релей ваши.
Часть 9. Семь граблей
1. Проверка «изнутри». Открыли https://мой-адрес из домашней сети, всё заработало — это hairpin NAT на роутере, а не доступ извне. Проверять только с мобильного интернета при выключенном Wi-Fi.
2. Забытый keepalive. См. выше. Самая частая причина «работало вчера».
3. MTU. WireGuard по умолчанию ставит 1420. При двойной инкапсуляции (например, туннель поверх PPPoE) этого мало. Симптом характерный: SSH и ping работают, а HTTPS-страницы виснут на середине загрузки. Лечится MTU = 1380 в секции [Interface], дальше подбором.
4. Потерянный реальный IP клиента. После DNAT с masquerade fail2ban начинает банить 10.8.0.1, то есть сам туннель. Решение — PROXY protocol, как выше.
5. Открытый наружу SSH на релее. VPS с белым IP сканируется круглосуточно. Ключи, PermitRootLogin no, нестандартный порт как гигиена, fail2ban.
6. Всё в одном месте. Соблазн поселить на тот же VPS ещё и прокси-панель понятен, но релей — это машина, чей адрес вы раздаёте наружу. Разносите роли.
7. Забыли про исходящий трафик VPS. У дешёвых тарифов лимит бывает 1–2 ТБ/мес. Один вечер стриминга 4K через релей — и вы в перерасходе. Считайте заранее.
А как решили у себя — доплатили за белый IP, сидите на overlay или собрали релей? И отдельно интересно: у кого провайдер реально выдаёт рабочий IPv6, и получилось ли на нём жить без второго маршрута?
Источники
- RFC 6598 — IANA-Reserved IPv4 Prefix for Shared Address Space: диапазон
100.64.0.0/10, ограничения и издержки NAT444 - Cloudflare Tunnel — документация
- Cloudflare: Delivering videos with Cloudflare — запрет видеостриминга на Free/Pro/Business
- Cloudflare: лимиты размера тела запроса — 100 / 200 / 500 МБ по планам
- Tailscale Pricing — состав бесплатного плана
- WireGuard — Quick Start
Смежные материалы на форуме: дорожная карта домашнего сервера, сервер из старого смартфона, сети в Docker для самохостера.