Идея, вокруг которой построена Orca, звучит так: если один кодинг-агент решает задачу с вероятностью процентов шестьдесят, дешевле запустить трёх разных агентов параллельно и выбрать лучший результат, чем три раза переспрашивать одного. Проблема в том, что три агента в одной рабочей копии затопчут друг друга. Orca решает это буквально — каждой задаче свой git worktree, своя ветка, свой каталог на диске, свой терминал.
Авторы называют это не IDE, а ADE — Agent Development Environment. Разница не только в маркетинге: в Orca нет своей модели и своей подписки, вы приносите свои — Claude Code, Codex, Cursor CLI, что угодно ещё, — а Orca даёт обвязку вокруг них.
Это полное руководство: установка, модель работы, все крупные подсистемы с конкретными шагами и горячими клавишами, CLI целиком, удалённые режимы, готовые рецепты — и отдельно то, о чём на лендинге не пишут.
Коротко о проекте. Orca делает Stably (Y Combinator, зима 2022, Сан-Франциско, по данным YC — команда из четырёх человек). Репозиторий stablyai/orca, лицензия MIT, около 40 тыс. звёзд и 2,8 тыс. форков на момент написания. Стек — TypeScript + Electron. Продукт бесплатный, есть отдельный enterprise-тариф.
Что внутри. 1 — модель Orca. 2 — установка. 3 — первая сессия. 4 — навигация. 5 — общие файлы между worktree. 6 — агенты (включая подключение GLM и переключение аккаунтов). 7 — ревью, коммит, PR. 8 — редактор, вьюеры, explorer. 9 — браузер и Design Mode. 10 — терминал. 11 — четыре режима запуска. 12 — CLI и оркестрация. 13 — мобильное приложение. 14 — уведомления. 15 — настройки и телеметрия. 16 — пять готовых рецептов. 17 — что ломается. 18 — трезвая оценка.
Часть 1. Модель Orca: четыре уровня
Прежде чем ставить, стоит понять иерархию — она объясняет почти всё поведение интерфейса.
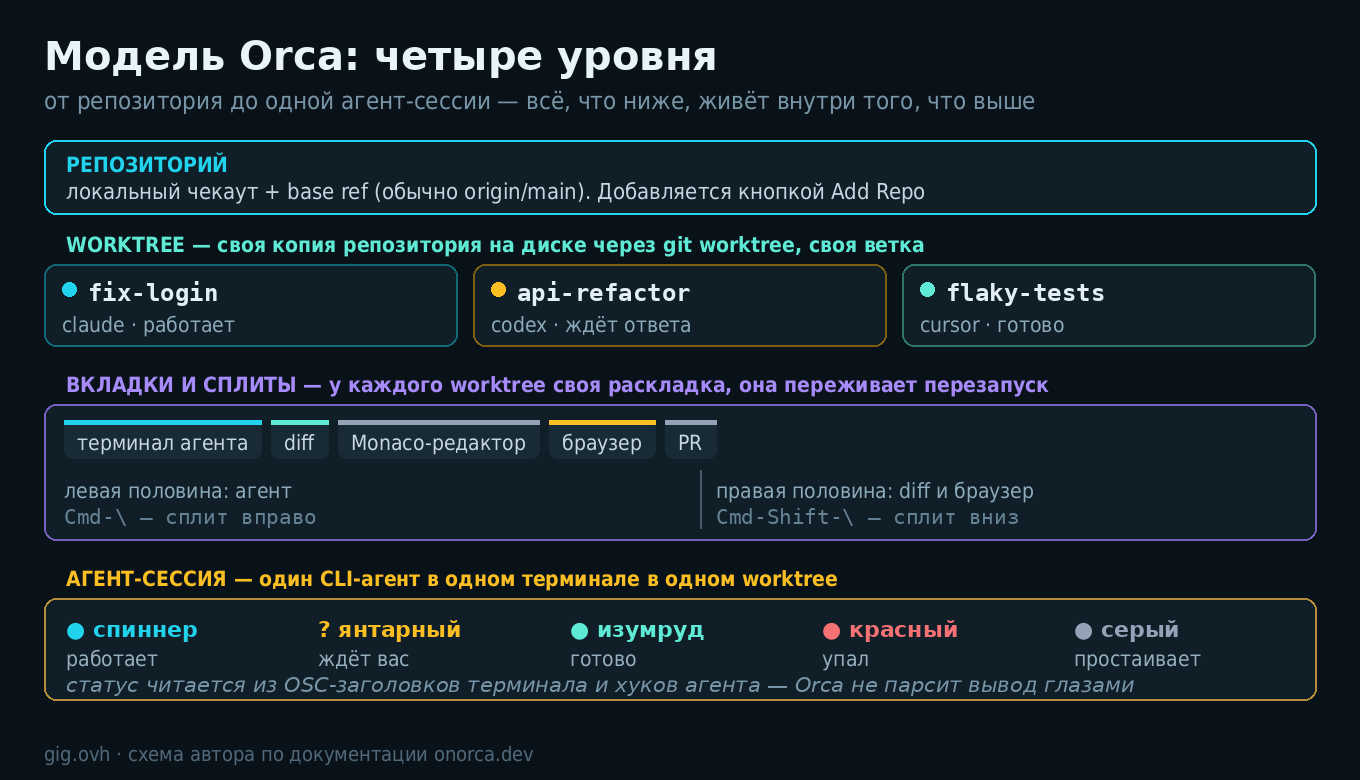
Схема на основе документации onorca.dev
Репозиторий. Локальный чекаут, который вы добавляете кнопкой Add Repo. У него есть base ref — обычно origin/main, — от которого по умолчанию отпочковываются новые worktree. Меняется в настройках репозитория.
Worktree. Ключевая сущность. Формулировка из документации предельно прямая: «every task gets its own on-disk copy of the repo via git worktree». Это настоящие гитовые worktree, а не абстракция поверх — вы можете зайти в каталог обычным терминалом и работать штатным git.
Жизненный цикл: Create → Work → Review → Ship → Archive/Delete. Создание асинхронное: диалог закрывается сразу, гитовые операции доигрываются в фоне.
Стартовать worktree можно от base ref репозитория, от другой локальной ветки, от конкретного SHA или от удалённой ветки — её Orca подтянет сама. Имя ветки выводится из названия задачи или из привязанного тикета GitHub/Linear/Jira; эмодзи-шорткоды вроде :rocket: превращаются в читаемый фрагмент имени (rocket). В Advanced-шторке имя ветки можно задать руками.
В сайдбаре worktree группируются по проектам, есть фильтры: спящие воркспейсы, дефолтные ветки, созданные через CLI, состояния detached HEAD. Мультивыбор по Cmd/Ctrl-клику даёт групповые операции.
Вкладки, панели и сплиты. Формулировка из доки: «Tabs group into panes; panes split into layouts».
- Вкладка — одна сущность: терминал, буфер редактора, браузер, дифф. Вкладки перетаскиваются внутри группы и между группами.
- Сплит создаётся перетаскиванием вкладки к краю панели: к правому — горизонтальный сплит, к нижнему — вертикальный. Вложенность не ограничена.
- Терминальные вкладки умеют делиться ещё и внутри себя — через меню вкладки или кнопку в заголовке.
- Закреплённые границы (pinned boundaries) не съезжают при ресайзе окна, позиции запоминаются на каждый worktree.
- Раскладка у каждого worktree своя и переживает переключение контекста и перезапуск приложения.
| Действие | macOS | Windows / Linux |
|---|---|---|
| Следующая / предыдущая вкладка (любого типа) | Cmd+Shift+] / [ |
Ctrl+Shift+] / [ |
| Следующая / предыдущая вкладка того же типа | Cmd+Option+] / [ |
Ctrl+Alt+] / [ |
| Предыдущая недавняя вкладка | Ctrl+Tab |
Ctrl+Tab |
| Закрыть все файловые вкладки | Cmd+Option+W |
Ctrl+Alt+W |
| Сплит вправо | Cmd-\ |
Ctrl-\ |
| Сплит вниз | Cmd-Shift-\ |
Ctrl-Shift-\ |
Агент-сессия. «Один CLI-агент в одном терминале в одном worktree». Orca следит за состоянием и рисует глиф:
| Индикатор | Значение |
|---|---|
| Спиннер | агент работает |
| Янтарный вопросительный знак | ждёт вашего действия — разрешения или ввода |
| Изумрудная галочка / точка | закончил или тихо активен |
| Красная точка | заблокирован, прерван, ошибка |
| Серая точка | простаивает |
| Ничего | обычный шелл, агент не распознан |
Статус определяется не эвристикой по тексту, а через OSC-заголовки терминала и хуки статуса, которые эмитят Claude Code, Codex и совместимые агенты. Поэтому у экзотического агента индикатора может не быть вовсе — это не баг, а отсутствие интеграции.
Жизненный цикл сессии в доке описан так: запуск из комбобокса → фаза работы с обновлениями OSC-заголовка → определение простоя, порождающее уведомление → выход, после которого появляется чип Restart.
Часть 2. Установка
Десктоп — macOS (Apple Silicon и Intel), Windows, Linux.
# macOS, Homebrew
brew install --cask stablyai/orca/orca

# Arch Linux, AUR
yay -S stably-orca-bin
Прямые загрузки из релизов на GitHub:
orca-macos-arm64.dmg     — macOS Apple Silicon
orca-windows-setup.exe   — Windows
orca-linux.AppImage      — Linux (есть и .deb)
Что происходит при первом запуске. Orca просит доступ к домашнему каталогу для работы с репозиториями, импортирует уже существующие конфиги Claude, Codex и Ghostty, если они есть, и показывает пустой воркспейс — добавляйте первый репозиторий.
Обновления. Автообновление включено, канал по умолчанию — stable. При клике на «Check for Updates» модификаторы дают доступ к другим каналам: Shift — свежий RC-предрелиз, Cmd/Ctrl — сборка с тегом производительности, Option (macOS) — валидированные локальные билды.
Релизы выходят практически ежедневно. На 12 августа 2026 чейнджлог на сайте показывает 1.4.180 (11 августа). Страница релизов на GitHub в момент проверки отдавала более старую версию — расхождение объясняется задержкой публикации ассетов и кэшированием; ориентируйтесь на чейнджлог и на встроенный апдейтер.
Платформенные оговорки. На macOS сборка подписана и нотаризована — запросы подтверждения при первом запуске нормальны. На Windows шелл по умолчанию (PowerShell, cmd, WSL) выбирается в Settings → Terminal.
Часть 3. Первая сессия: три агента на одну задачу
Это и есть сценарий, ради которого Orca написана. По шагам, как в официальном туториале.
- Добавьте репозиторий. Кнопка Add Repo в сайдбаре, выбираете локальный чекаут. Orca читает состояние git и берёт дефолтную ветку как base ref.
- Создайте worktree. Иконка «+» рядом с именем репозитория. Впишите описание задачи — если пропустить, Orca сгенерирует имя в морской тематике. Откроется лаунчер с вашим агентом по умолчанию (или пустой терминал, если так настроено).
- Выберите агента. В терминале — комбобокс с выбором: Claude Code, Codex, Cursor CLI и остальные. Orca поднимет CLI агента с правильным рабочим каталогом и вашими учётками.
- Повторите дважды. Три worktree, три разных агента, одинаковый промпт.
- Разложите панели. Перетащите вкладки к правому или нижнему краю — получите сплиты. Смотрите на всех троих одновременно.
- Сравните и отгрузите. У каждого worktree свой дифф. Аннотируете лучший, коммитите, пушите, создаёте PR. Проигравшие worktree удаляются одним кликом вместе с ветками.
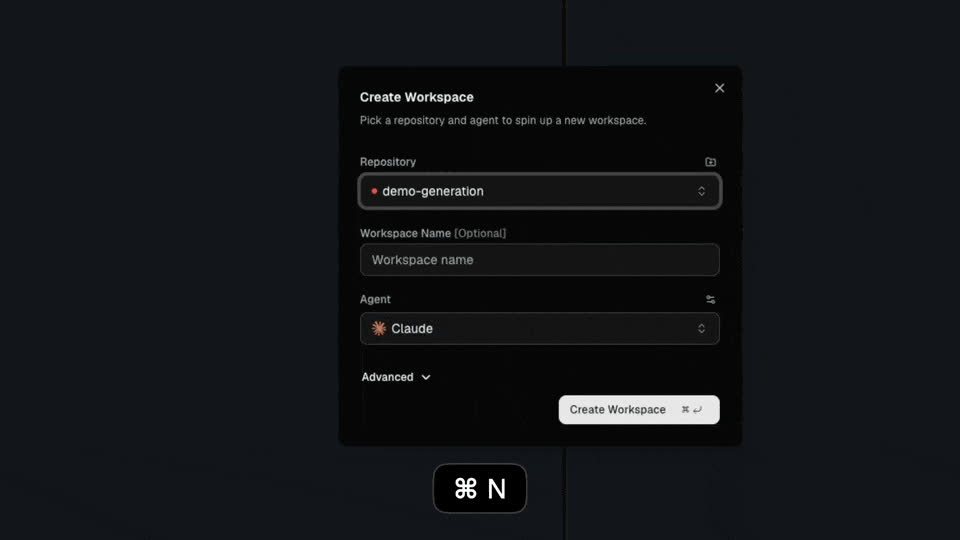
Обоснование из документации, и оно честное: «Different agents make different mistakes. Running the same task in parallel is cheaper than sequential retries and surfaces disagreement as a signal». Расхождение между агентами — само по себе полезный сигнал: если трое сделали одинаково, задача простая; если разошлись — там, где разошлись, и надо смотреть внимательнее.
Экономика этого приёма зависит от вашего тарифа. Три агента на одну задачу — это тройной расход лимитов. На подписке с пятичасовым окном вы упрётесь в потолок быстрее, чем ожидаете, и Orca это честно показывает в статус-баре (см. часть 6).
Часть 4. Навигация, когда worktree стало десять
Три инструмента поиска, каждый со своей областью действия.
| Что | Клавиши | Что ищет |
|---|---|---|
| Quick Open | Cmd-P / Ctrl-P |
файлы текущего worktree; ранжирование по свежести плюс качеству совпадения, сначала имена файлов; gitignored — вторым проходом |
| Омнибокс новой вкладки | кнопка «+» в полосе вкладок | открытые вкладки, файлы, URL и агентов в одном поле; уже открытый файл не дублирует, а переключает на существующую вкладку |
| Jump Palette | Cmd-J / Ctrl-J |
все worktree и все вкладки сразу |
Jump Palette — главный инструмент, когда worktree стало десять. Что он показывает:
- недавние чаты и терминалы, до шести штук, по активности;
- недавние worktree по времени последнего фокуса;
- проекты и группы репозиториев;
- вообще все worktree, сгруппированные по репозиторию;
- закэшированные заголовки и номера GitHub PR (
#123) и GitLab merge request (!123); - открытые вкладки по алиасам типа —
terminal,simulator.
Внутри палитры:
Enter— перейти;Shift-Enter— открыть в новом сплите вместо замены текущей панели;Tab— фильтр по хосту или проекту;Cmd-1…Cmd-6(Ctrl-1…Ctrl-6) — быстрый переход к недавним сессиям по номеру.
Все привязки переназначаются в Settings → Shortcuts.
Часть 5. Разделение файлов между worktree
Самая частая практическая боль: новый worktree — это чистый чекаут, а значит, без node_modules, без .env, без venv. Orca даёт три механизма, и они дополняют друг друга.
Worktree Shared Paths (Settings → Repository) — материализуют gitignore-каталоги в новый worktree: на macOS через APFS clone-copy, на остальных системах — симлинками.
orca.yaml — поле worktree.sharedDirectories для больших пересобираемых деревьев вроде node_modules.
.worktreeinclude — файл со списком gitignored-путей, которые нужно именно копировать, а не симлинковать.
Разница между копией и симлинком тут принципиальна. node_modules можно расшарить симлинком — его пересборка идентична. А вот .env с локальным портом или база SQLite должны копироваться: если три агента будут писать в один и тот же файл через симлинк, изоляция worktree превращается в фикцию, и вы получите гонки, которые будете отлаживать полдня.
Хуки создания. В Settings → Repository → Hooks можно повесить команды, выполняющиеся после создания worktree, — типовое применение: npm install, восстановление окружения, миграции.
Часть 6. Агенты
Кто поддерживается и с какой глубиной
| Агент | Уровень интеграции |
|---|---|
| Claude Code | глубокая: usage, hot-swap аккаунтов, хуки, субагенты |
| Claude Agent Teams | выключено по умолчанию, включается в настройках |
| Codex | глубокая: usage, hot-swap, продолжение сессий |
| Cursor CLI | первый класс: запуск из комбобокса, полное определение состояния по OSC, чип Restart при выходе |
| GitHub Copilot CLI, Aider, Cline, Continue | автонастройка |
Дальше идут агенты, которые Orca знает и запускает автоматически, но без учёта расхода и переключения аккаунтов: Grok, OpenCode, Pi, OMP, Gemini, Antigravity, Ante, Goose, Amp, Kilocode, Kiro, Charm Crush, Auggie, Autohand, Codebuff, Command Code, Devin, Droid (Factory), Kimi, Mistral Vibe, MiniMax, Qwen Code, Rovo Dev, Hermes, OpenClaw, Trae. Плюс любой терминальный агент вручную — Orca в конце концов просто держит PTY.
Разрешения: самое важное место во всём руководстве
Orca по умолчанию подставляет агентам флаги полной автономии. Точный список из документации:
| Агент | Флаг по умолчанию |
|---|---|
| Claude | --dangerously-skip-permissions |
| Codex | --dangerously-bypass-approvals-and-sandbox |
| Остальные (Gemini и прочие) | --yolo |
Это означает буквально следующее: агент выполняет команды в вашем каталоге без подтверждений. Не «спросит перед rm -rf», не «покажет команду». Флаг называется dangerously не для красоты.
Режим переключается глобально в Settings → Agents → Agent Permissions («Yolo» ↔ «Manual») и отдельно для каждого агента — там же правятся аргументы запуска. Прежде чем запускать первый worktree на рабочем проекте — зайдите туда и посмотрите, что выбрано.
Отдельно про то, что worktree — не песочница. Это обычный каталог на вашем диске с вашими правами. Агент оттуда видит весь домашний каталог, ваши SSH-ключи, ~/.aws, историю шелла. Изоляция worktree решает проблему конфликтов между агентами, а не проблему недоверенного кода.
Если вы гоняете агента на чужом репозитории или с MCP-серверами, тянущими внешний контент, — используйте Cloud VM на worktree (часть 11) или отдельную машину через SSH. Мы разбирали границы этой модели в теме «Агент в режиме „разрешаю всё“: контейнер, microVM или отдельная машина».
Claude Code
Установка и подключение — три шага:
npm i -g @anthropic-ai/claude-code
# затем обычный логин из любого терминала
Дальше Orca сама находит конфиг ~/.claude. Запуск — открыть терминал в любом worktree и выбрать Claude Code из комбобокса; рабочим каталогом станет worktree.
Что даёт интеграция:
- Usage. Orca читает локальное состояние расхода из
~/.claudeи показывает в статус-баре текущее потребление и близость к рейт-лимиту. - Несколько аккаунтов с переключением в один клик, в том числе посреди активной сессии.
- Субагенты и участники Agent Teams показываются раскрывающимися дочерними строками в списке агентов worktree и в Agent Dashboard.
- Хуки и файлы памяти на уровне репозитория.
Codex
Установка — по официальной документации OpenAI, затем логин из терминала; Orca читает креды из ~/.codex. Запуск — выбрать Codex из комбобокса, сессия стартует в каталоге worktree.
Особенности:
- Несколько аккаунтов. «System default» — это ваш настоящий логин в
~/.codex; дополнительные (managed) аккаунты получают изолированное хранилище. - Windows/WSL. Codex работает через WSL, домашние каталоги аккаунтов изолируются здесь:
~/.local/share/orca/codex-accounts/<id>/home. - Субагенты показываются дочерними строками с шевроном.
- «Continue in New Session…» — пункт меню, который запускает новую сессию, инжектируя ограниченный handoff-промпт из предыдущего транскрипта. Полезно, когда контекст переполнен, а бросать нить не хочется.
- Restart перезапускает агента с тем же аккаунтом, если переключатель не сменил активный раньше.
Переключение аккаунтов (hot-swap) — пошагово
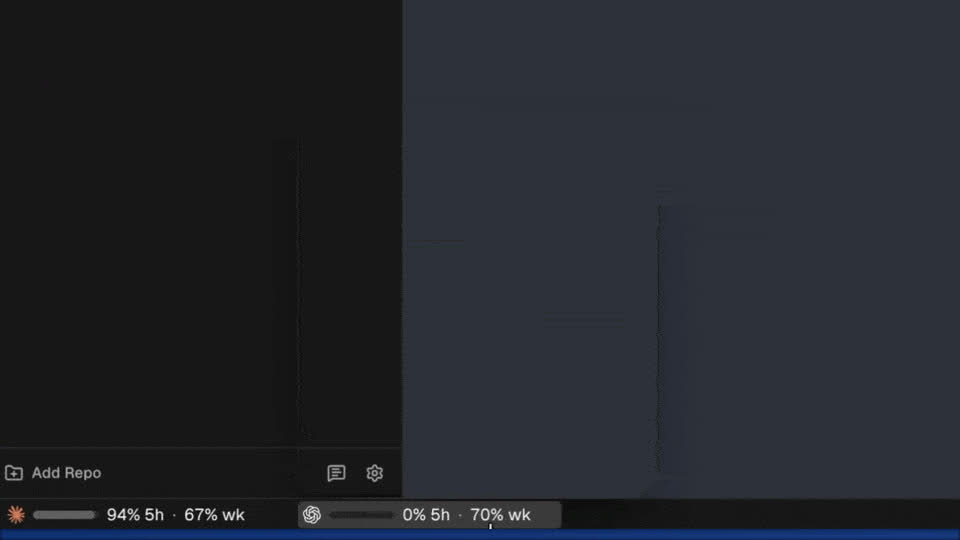
Скриншот Orca, onorca.dev
- Аутентифицируйте каждый аккаунт Codex обычным способом через терминал — креды осядут в
~/.codex. - Откройте Settings → Agents → Codex Accounts. Orca покажет все найденные аккаунты вместе с метриками использования и лимитами.
- Присвойте понятные метки — «personal», «work».
- Переключение — клик по чипу статуса Codex в статус-баре, откроется переключатель аккаунтов.
Тонкости поведения:
- Новые сессии подхватывают выбранный аккаунт; уже запущенные сохраняют исходный до перезапуска.
- Для managed-аккаунтов Orca зеркалирует настройки из
~/.codex/config.tomlв runtime-home. Если исходный файл отсутствует, пуст или нечитаем — покажет предупреждение и оставит последние успешно синхронизированные настройки. - Переключатель Claude работает идентично, используя
~/.claudeкак каталог данных.
Cursor CLI
Ставится по документации Cursor, логинится один раз, дальше Orca находит его в системном PATH. Важная оговорка из доки: выбор модели полностью на стороне Cursor CLI, Orca его не переопределяет — настраивать внутри самого CLI.
Подключение GLM-5.2 и других OpenAI-совместимых провайдеров
Отдельная страница документации, которую легко пропустить, а она практичная. Нужна активная подписка Z.ai CodePlan с доступом к GLM Coding Plan.
Для Claude Code — переменные окружения в ~/.claude/settings.json:
CLAUDE_CODE_AUTO_COMPACT_WINDOW=1000000
ANTHROPIC_DEFAULT_HAIKU_MODEL=glm-4.5-air
ANTHROPIC_DEFAULT_SONNET_MODEL=glm-5.2[1m]
ANTHROPIC_DEFAULT_OPUS_MODEL=glm-5.2[1m]
Суффикс [1m] включает вариант с контекстом на миллион токенов. Для кодинга рекомендуется поставить effort в max.
Для OpenAI-совместимых обвязок — OpenCode, Cline, Kilo Code, Roo Code, Droid:
| Параметр | Значение |
|---|---|
| Base URL | https://api.z.ai/api/coding/paas/v4 |
| Model name | glm-5.2 |
| Context window | 1000000 |
| Image support | отключить, если поддержка явно не задокументирована |
Для OpenClaw — правка ~/.openclaw/openclaw.json: добавить GLM-5.2 в список моделей с contextWindow: 1000000 и maxTokens: 131072, затем перезапустить шлюз:
openclaw gateway restart
Это ровно тот случай, когда «своя подписка» из философии Orca даёт практическую выгоду: инструмент не заставляет вас платить именно Anthropic или OpenAI. Но проверьте условия своего провайдера — прокидывание чужой модели под видом Anthropic-совместимого API живёт ровно до тех пор, пока это поддерживает конкретный шлюз.
Agent Dashboard
Включается в Settings → Experimental → Agent Dashboard. Два вида:
- Dashboard — канбан с колонками Needs You, Working, Done, Idle (последняя скрыта по умолчанию).
- Agent Map — топологическая визуализация: worktree, вложенные в проекты, с линией происхождения агента, если она известна.
Фильтры: по проекту, по статусу воркспейса, по статусу PR/MR. На карточке — иконка агента и имя сессии, превью последнего сообщения, иконка проекта, имя worktree и его возраст, цветовая индикация (янтарный — требует внимания, зелёный — закончил).
История сессий и возобновление
Панель Agent Session History — правый сайдбар, вкладка Agents. В заголовке счётчик вида «12 shown · 47 recent» и строка поиска: фильтрует по названию сессии, рабочему каталогу, ветке, модели и по тексту превью разговора.
Область видимости: Workspace (текущий worktree) / Project (активный проект) / All (все найденные сессии по всем агентам).
View Options: выбор конкретных агентов — Claude, Codex, Hermes, Pi, OMP, Cursor, Gemini, Antigravity, Rovo Dev, Copilot, OpenCode, Grok, OpenClaw, Devin, Droid, Kimi; сортировка Last updated или Created; группировка по Project, Folder или Agent; тумблер «Hide empty sessions».
Действия на строке сессии: Resume (открывает новый терминал в cwd сессии и запускает resume-команду агента), скопировать resume-команду, скопировать ID сессии или путь к логу, открыть или показать файл лога, открыть рабочий каталог.
Где физически лежат транскрипты:
Codex     ~/.codex/sessions
Claude    ~/.claude
OpenCode  ~/.local/share/opencode/opencode.db
Resume требует локального воркспейса — удалённые воркспейсы напрямую выполнить resume-команду не могут.
Гибернация
Простаивающие фоновые агент-терминалы Orca усыпляет, а при возврате в worktree поднимает обратно. Условия: агент в состоянии done (закончил ход и ничего не ждёт), выдержан idle-таймаут, нет нажатий клавиш, тип агента поддерживается — Claude, Codex, Gemini, Antigravity, OpenCode, Pi, MiMo Code, Droid, Grok, Devin, OMP.
Настройка — Settings → Experimental → Agent hibernation, окно от 1 минуты до 24 часов, по умолчанию 30 минут. Отсчёт идёт от последнего done; любое нажатие, новый вывод или возврат на вкладку его сбрасывает.
Пробуждение честное: Orca перезапускает CLI с теми же resume-флагами, что и история сессий — claude --resume <id>, codex resume <id> и так далее, — поэтому диалог, рабочий каталог и сессия провайдера продолжаются с того же места.
Не гибернируются нерезюмируемые терминалы: Cursor CLI, Hermes, Copilot, Trae — они просто продолжают жить.
Учёт расхода и лимитов
Трекинг есть для Claude Code, Codex, Gemini, OpenCode, Kimi Code и MiniMax.
В статус-баре: текущий расход относительно плана активного аккаунта, время сброса окон — пятичасового, дневного, недельного (и «Claude Fable weekly», где применимо), и предупреждающий индикатор при переходе порога 80 %.
Клик открывает поповер: все отслеживаемые провайдеры с иконкой, именем, планом, ближайшим сбросом и полосками по каждому окну, отсортированные так, что самый тесный лимит сверху. Два режима — Detailed (полные полоски, подписи, проценты) и Compact (только самое тесное окно). В Settings → Appearance выбирается, показывать «% used» или «% remaining».
В блоке Stats может показываться оценка стоимости для известных семейств моделей; строки с пометкой «• inferred pricing» считаются по локальной таблице цен Orca, а не по биллингу провайдера.
Данные берутся из локального состояния, которое каждый агент ведёт у себя на диске — ~/.claude, ~/.codex и аналогичные пути. Никаких обращений к API и никакой дополнительной авторизации. Плюс: ничего лишнего никуда не уходит. Минус: свежесть цифр определяется тем, когда агент обновил свою бухгалтерию, а не реальным временем.
Chat UI поверх терминала
Экспериментальная надстройка над терминалами поддерживаемых агентов: Claude, Codex, Grok, OMP. Сессии OMP открываются сразу в Chat UI.
Включение: Settings → Experimental → Chat UI → включить, опционально выставить Default view = Chat UI для новых вкладок поддерживаемых агентов. Переключение Chat UI ↔ терминал — из панели агента.
Что даёт:
- композер: отправка сообщения, остановка текущего хода, вложения файлов и картинок;
- черновики и вложения переживают разрыв и восстановление соединения;
/открывает слэш-команды и обнаруженные скиллы, отфильтрованные под конкретного агента;- пилюли выбора модели и опций: список моделей Claude берётся из установленного на хосте CLI; Codex переключает модель пилюлей (под капотом шлёт
/model <id>); Grok — модель флагом-mпри запуске или/modelпосреди сессии, уровень рассуждений--reasoning-effortпри запуске или/effortпосреди сессии; - структурированные карточки разрешений и вопросы Claude (AskUserQuestion) рендерятся прямо в транскрипте, отвечать можно из композера.
Дословная оговорка авторов: «Transcript fidelity, streaming, and terminal parity are still under active tuning. Prefer the raw TUI when you need every OSC/status detail». То есть на сегодня Chat UI — удобство, а не источник истины. Когда важна каждая деталь вывода — смотрите сырой терминал.
Хуки и память
Orca не изобретает свой формат, а читает существующие соглашения: каталоги .claude/ и .codex/ в репозитории, файлы памяти CLAUDE.md (Claude) и AGENTS.md (Codex) в корне или во вложенных каталогах — они редактируются inline через файловый explorer.
Хуки статуса агента (working / waiting / done) управляются в Settings → Agents → Agent status hooks, есть и CLI:
orca agent hooks status --json
orca agent hooks on --json
orca agent hooks off --json
Эндпойнты хранятся локально и переподхватываются при каждом вызове, поэтому долгоживущие сессии продолжают достукиваться до живого сервера Orca даже после перезапуска приложения. На Windows и POSIX формат хранения разный: endpoint.cmd против endpoint.env.
Часть 7. Ревью, коммит и отгрузка
Параллельные агенты бессмысленны, если вы не читаете, что они написали. Ревью-часть в Orca проработана заметно лучше, чем в среднем «AI-редакторе».
Diff viewer
Показывается комбинированный дифф по всем staged, unstaged и untracked файлам сразу, по умолчанию — относительно start-from ref.
| Клавиша | Действие |
|---|---|
j / k |
навигация по файлам |
n / p |
навигация по ханкам |
F7 / Shift+F7 |
навигация по изменениям |
s |
застейджить ханк |
c |
комментарий на строке |
Что умеет:
- диффы картинок — три режима: side-by-side, swipe и onion-skin;
- HTML-превью — для рабочих HTML-файлов в комбинированном диффе есть «Open Preview to the Side»;
- разрешение конфликтов — трёхсторонний вид с inline-правкой;
- визуальный staging — по ханкам и по отдельным строкам, то есть
git add -pмышкой; - смена базы сравнения — с start-from ref на любой коммит, ветку или base ref, прямо из тулбара диффа;
- сворачиваемое дерево файлов с изменяемой шириной панели, которая запоминается между сессиями.
Перенос длинных строк в диффе выключен по умолчанию. Переключается из меню действий в шапке редактора или глобально в Settings → General → Diff Word Wrap. В обычном редакторе Monaco, наоборот, перенос включён — это две независимые настройки, и это регулярно сбивает с толку.
Аннотирование AI-диффа
Порядок действий:
- Наводите курсор на строку диффа — в гаттере появляется
+. - Кликаете по нему или нажимаете
c, когда курсор стоит на нужной строке. - Пишете замечание — поддерживается markdown.
Cmd-Enter— сохранить,Esc— отменить.
Комментарии закрепляются за строками и отслеживают правки кода. Треды можно резолвить, нерезолвленные отправляются в следующую пачку.
Отправка агенту — кнопка «Send to agent» вверху диффа: все построчные комментарии собираются в один промпт, и появляется меню выбора — доработает тот же агент или запустится новый.
Про горячую клавишу — важное уточнение, в котором легко ошибиться. Это две разные команды:
- Add Review Note — добавить замечание. Привязка по умолчанию:
Cmd+Shift+A(macOS) /Ctrl+Shift+A(Windows/Linux). - Send Review Notes to Agent — отправить пачку агенту. По умолчанию клавиша не назначена вообще. Если хотите вешать на неё палец — назначьте сами в Settings → Shortcuts.
Батчинг здесь — не косметика. Если кидать агенту замечания по одному, он начинает качаться между противоречивыми правками: исправил по первому замечанию, сломал то, о чём было второе. Пачка даёт ему увидеть все требования сразу. Это тот случай, когда UI-решение реально влияет на качество результата.
Атрибуция
Orca отслеживает происхождение кода построчно: провенанс записывается, когда агент меняет файлы своими инструментами. В diff viewer строки от ИИ помечены неброским маркером в гаттере; если человек потом отредактировал строку, авторство возвращается к человеку.
Дословно из документации: «Attribution is local to Orca — it doesn’t get committed to git». То есть данные живут внутри Orca и в репозиторий не попадают. Выгрузить их можно, экспортировав метаданные диффа из тулбара.
Зачем: понимать, где смотреть внимательнее; проходить аудиты, где нужно отделить машинный код от человеческого; не перечитывать по третьему разу то, что писали руками.
Коммит, пуш и создание PR
Панель коммита стоит рядом с diff viewer — по формулировке доки, «commit, push, and open the review without leaving Orca».
Коммит:
- Застейджить изменения по ханкам или по файлам прямо из диффа.
- Написать сообщение руками или нажать «Generate with AI».
- Нажать Commit — или
Cmd-Enter(macOS) /Ctrl-Enter(Windows/Linux).
Pre-commit хуки выполняются автоматически. Если хук упал — появляется «Fix with AI»: агент получает вывод хука, сообщение коммита и список застейдженных файлов и пытается починить.
Пуш: кнопка Push отправляет ветку в origin и при первом пуше настраивает upstream. Для переписанной истории — отдельное явное действие «Force push with lease», которое перед выполнением показывает число коммитов и имя upstream-ветки; под капотом --force-with-lease, то есть защита от затирания чужих коммитов.
PR: после пуша в панели Source Control появляется создание hosted review с подтверждением base branch, заголовка, описания и draft-статуса. Кнопка «Generate pull request details with AI» сочиняет заголовок и описание по диффу ветки и коммитам.
Конфликты: при merge или rebase доступно «Resolve with AI» наряду с ручным разрешением.
AI Action Recipes
Все четыре ИИ-действия выше — это настраиваемые рецепты, а не зашитые промпты. Живут в Settings → Git & Source Control → Action recipes.
| Рецепт | Что делает |
|---|---|
| Generate with AI | сообщение коммита |
| Generate pull request details with AI | заголовок и описание PR |
| Fix with AI | починка после падения pre-commit хука |
| Resolve with AI | разрешение конфликтов merge/rebase |
В шаблонах доступны переменные — в документации упомянуты {stagedFiles}, {linkedIssue}, {patch}.
Практический смысл: если у вас в команде принят конкретный формат сообщений коммитов — Conventional Commits, префикс с номером тикета, обязательная строка Refs: — не воспитывайте агента каждый раз промптом, а один раз перепишите рецепт под свой формат. Это ровно то место, где пять минут настройки экономят сотни правок вручную.
GitHub, GitLab и остальные
Подключаются GitHub, GitLab, Bitbucket, Azure DevOps и Gitea (Settings → Integrations); глубже всего проработан GitHub — Actions и issues.
- Hosted review доступен из панели Source Control после пуша; связанные ревью показывают статус open / merged / closed в сайдбаре, есть кнопка «Open review page in browser».
- Меню действий PR: скопировать ссылку, закрыть, переоткрыть.
- Чеки и комментарии GitHub рендерятся inline во вкладке PR; пайплайны GitLab показывают bridge- и child-джобы с трейс-логами. Отвечать в тред можно прямо из панели.
- «Fix broken checks» отдаёт агенту детали упавших проверок.
- Auto-merge для GitHub PR: метод соответствует дефолту репозитория — Squash and merge / Create merge commit / Rebase and merge. Опция скрыта для драфтов, закрытых, конфликтующих и нестабильных PR.
- Упавшие GitHub Actions показываются красными чипами на worktree с кликабельными логами джоб.
- Issues: ящик просмотра, фильтрации и редактирования issue GitHub и GitLab; создание worktree из issue предзаполняет имя задачи и сохраняет привязку.
- GitHub Projects — полноценные project views с фильтрацией по исходному репозиторию.
- В свежих версиях появились stacked pull requests — механику «стопок» мы разбирали в отдельной теме.
Linear — подключение по шагам
- Settings → Integrations → Linear.
- Вставить персональный API-токен из Linear → Settings → API.
- Выбрать нужные команды (teams).
Что появляется:
- Task drawer — объединённый вид issue из GitHub и Linear в одном списке.
- Режим «Has Workspace» фильтрует issue, уже привязанные к локальным worktree; клик по такой строке открывает воркспейс.
- При создании worktree из Linear-issue открывается интерактивный composer: имя подставляется автоматически, ID issue прикрепляется, а имя ветки берётся предложенное самим Linear, а не слаг заголовка. В меню деталей есть «Copy suggested branch name».
- Управление issue: статус, assignee, приоритет (иконками Linear), метки, оценка.
- При запуске агента подтягиваются inline-изображения и медиа из описаний и комментариев issue.
- Текст в диалоге сохраняется, даже если диалог закрыт по Escape, Cancel или клику мимо.
- Длинные списки — пагинация кнопкой «Load more». Настройки отображения (список/доска, группировка, фильтры) переживают перезапуск, а последний использованный источник задач запоминается на каждый репозиторий.
- Синхронизация статуса — opt-in для каждой команды: переводит issue в «In Progress» при создании worktree.
- Для агентов: команда
orca linearи скиллorca-linearс операциями create / update / list / relations, флаги контекста--activityи--full.
Jira — подключение по шагам
- Открыть боковую панель Tasks, выбрать Jira в переключателе источника.
- Нажать «Connect Jira».
- Выбрать тип развёртывания: Cloud или Self-hosted.
Cloud: URL сайта (например https://example.atlassian.net), email аккаунта Atlassian и API-токен, который берётся на id.atlassian.com → Security → API tokens.
Self-hosted: базовый URL (включая путь, если Jira не в корне домена) и аутентификация одним из двух способов — Bearer PAT (рекомендуется для современных инсталляций) либо username + password (Basic auth, для legacy).
Можно подключить несколько Atlassian-сайтов сразу; в шапке Tasks появится переключатель сайтов с опцией «All sites».
Возможности: единый просмотр issue из разных источников, inline-правка статуса, приоритета, assignee и кастомных полей, комментарии прямо из ящика, сохранение черновиков новых issue в рамках сессии, создание worktree с автопривязкой, вставка URL issue.
Дословно: «Your Atlassian API token or self-hosted credentials are encrypted via the OS keychain and stored locally». Токены лежат в системном keychain, а не в конфиге открытым текстом, — что не отменяет обычной гигиены: выдавайте токену минимальные права и не заводите один общий токен на команду.
Когда GitHub начинает ругаться
Отдельная страница документации про ошибки GitHub — полезная, потому что содержит конкретные цифры.
| Корзина лимитов | Что покрывает | Лимит (аутентифицированный) |
|---|---|---|
| REST (core) | запросы PR/issue, метаданные чеков | 5 000 в час |
| GraphQL | запросы Projects/Tasks | 5 000 points в час |
| Search | списки на основе поиска | 30 в минуту |
Это почасовые бюджеты на пользователя, общие для всех инструментов — Orca, ваш gh в терминале и агент, дёргающий gh, едят из одного ведра.
Диагностика:
gh api rate_limit --jq '.resources | {core, graphql, search}'
gh api user -i 2>&1 | head -40
gh auth status -h github.com
Конфликт переменных окружения лечится так:
unset GITHUB_TOKEN GH_TOKEN
gh auth logout -h github.com
gh auth login -h github.com
gh api user --jq '{login, id}'
Важная оговорка из документации: раздел Settings → Git → GitHub API Budget показывает только пробное значение, которое может выглядеть «здоровее» реального состояния REST-вызовов. При расхождении верьте живым сообщениям об ошибках, а не цифре в настройках.
Типовые причины исчерпания лимита: несколько окон Orca, одновременно обновляющих данные; агенты, автоматизирующие gh; «тяжёлые» задачи с веером по нескольким репозиториям; сторонние приложения на том же токене.
Часть 8. Редактор, вьюеры и файлы
Monaco
Редактор — Monaco, тот же движок, что в VS Code. Автосохранение срабатывает при потере фокуса и в паузах; индикатора несохранённых изменений нет — он не нужен.
| Шорткат | Действие |
|---|---|
Cmd-D |
выделить следующее вхождение |
Cmd-F |
поиск по файлу |
Cmd-Shift-F |
поиск по всему worktree |
Cmd-Click |
переход к определению (зависит от языка) |
Alt+Z |
переключить перенос строк |
Changes View Mode — режим из меню вкладки редактора: показывает дифф HEAD против рабочего дерева прямо в редакторе, с той же навигацией (n / p по ханкам, s — застейджить).
Настройки: перенос строк по умолчанию включён (Settings → General → Editor Word Wrap, отдельная настройка для диффа); миникарта по умолчанию выключена (Settings → Appearance); свой шрифт редактора там же — пустое значение означает «брать шрифт терминала».
Дословная позиция авторов: «Orca is intentionally editor-first, not IDE-first — run type-checkers and linters in a terminal pane». Ни языкового сервера, ни встроенного дебаггера, ни интеграции с тест-раннером здесь нет и не планируется. Если вы ждёте замену JetBrains — это не она.
Markdown-редактор
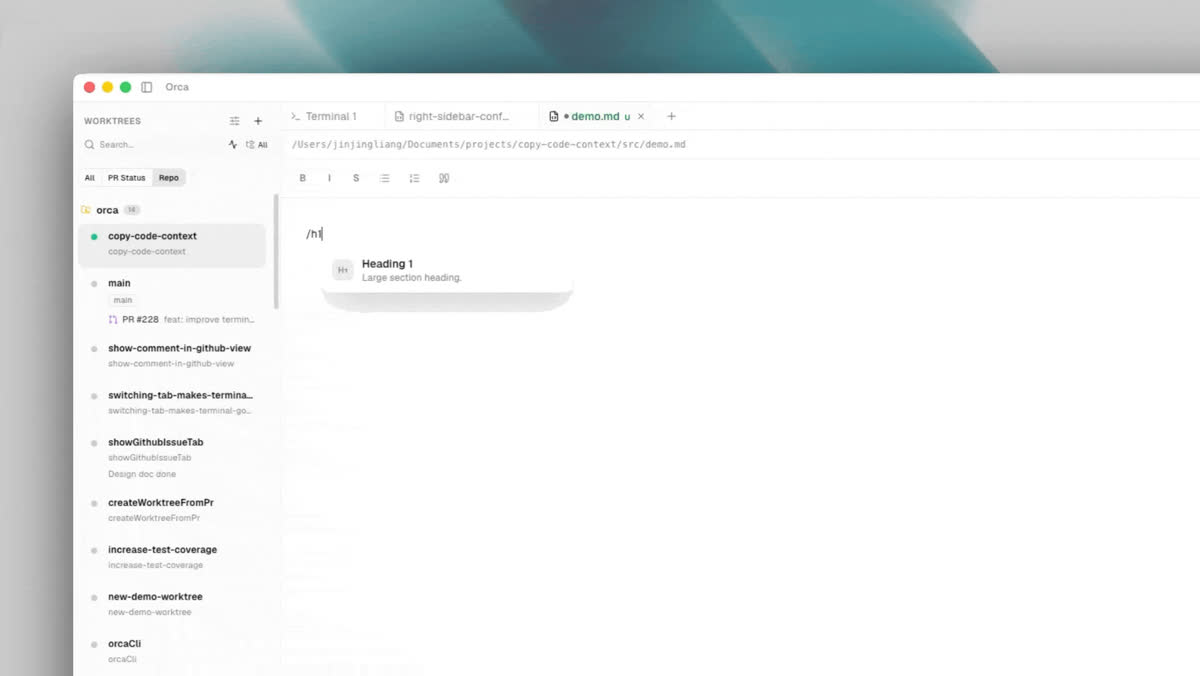
Скриншот Orca, onorca.dev
Файлы .md открываются в богатом редакторе: тулбар, inline-превью, автодополнение внутренних ссылок. Переключение на сырой Monaco — Cmd-Shift-M.
- Слэш-меню. Ввод
/на пустой строке даёт заголовки, списки, код-блоки, callout-блоки, изображения, диаграммы mermaid и toggle-блоки. Команды/toggle-textи/toggle-h1…/toggle-h5создают сворачиваемые блоки, которые сохраняются как переносимый markdown через<details>/<summary>. - Вики-ссылки. Ввод
[[вызывает автодополнение относительных путей внутри worktree. - Поиск по отрендеренному тексту, а не по синтаксису. Запрос «Install» найдёт и
# Install, и эквивалентный<h1>Install</h1>. - Front matter. YAML и TOML показываются по умолчанию; скрывается на файл через меню «…» → «Hide front matter».
- Оглавление — иконка дерева в шапке редактора, сворачиваемый outline по заголовкам, работает и в rich-, и в preview-режиме.
Работа с таблицами:
| Клавиша | Действие |
|---|---|
Tab / Shift-Tab |
переход по ячейкам; Tab за последней ячейкой добавляет строку |
Enter |
переход вниз; из последней ячейки добавляет строку |
Backspace в пустой строке |
удалить строку, а если строка последняя — всю таблицу |
Backspace в пустой ячейке |
перейти к предыдущей ячейке |
Share as Artifact — публикация markdown публичной ссылкой через аккаунт Orca. Требует включения в Settings → Artifacts → «Allow publishing public artifact links» (по умолчанию выключено). Управление — на странице Artifacts в сайдбаре, из CLI:
orca artifacts share ./notes.md --json
orca artifacts update ./notes.md --json
orca artifacts list --json
orca artifacts unshare ./notes.md --json
orca artifacts delete <id> --json
Вьюеры
| Формат | Что умеет |
|---|---|
| Mermaid | рендер inline в превью markdown; отдельные .mmd открываются в своём вьюере с панорамированием и зумом |
| прокрутка, зум, выделение текста; позиция скролла сохраняется в рамках сессии и сбрасывается при перезапуске Orca | |
.png .jpg .svg .webp .gif |
просмотр плюс режим image-diff для сравнения бок о бок |
.csv .tsv |
табличный вьюер с сортировкой колонок и быстрым поиском; переключается на сырой текст для правки ячеек |
.ipynb (beta) |
отрендеренный markdown, подсветка кода, вывод ячеек; правка пишется обратно в файл с сохранением nbformat, чтобы диффы оставались чистыми |
Файловый explorer
Слева у каждого worktree, следит за файловой системой в реальном времени. Сортировка — натуральная, с учётом чисел: 9, 99, 100, а не лексикографическая.
Перетаскивание извне:
- файлы из Finder/Explorer в дерево — копируются;
- изображения в markdown-редактор — вставляются по позиции курсора;
- файлы на терминал агента — в промпт вставляется путь;
- в SSH-worktree файлы автоматически загружаются на удалённый хост.
Git-интеграция: файлы подсвечены по статусу (untracked, modified, staged, ignored). Контекстное меню: discard, stage, rename, «Copy Path», «Copy Relative Path» (Cmd+Option+Shift+C / Ctrl+Alt+Shift+C).
Файловые операции: «Copy» кладёт файл в системный буфер; для удалённых файлов есть «Download», для папок — «Download Folder» (в веб-клиенте недоступно).
Поиск: правый клик по папке → «Find in Folder», либо выделить папку и нажать Cmd-Shift-F / Ctrl-Shift-F.
Восстановление сессии
Что восстанавливается: открытые worktree из сайдбара, раскладка панелей со вложенными сплитами и фокусом для каждого worktree, работающие процессы агентов (живут в фоновом демоне, Orca переподключается), скроллбэк терминалов — включая вывод, накопившийся пока приложение было закрыто, последний сфокусированный worktree и вкладка.
| Сценарий | Что с агентами |
|---|---|
Cmd-Q |
продолжают работать |
| Перезапуск автообновлением | не затронуты |
| Падение приложения | тёплое переподключение, демон удержал сессии |
| Перезагрузка хоста | завершены; раскладка и последний скроллбэк восстановятся |
Чтобы начать с чистого листа — закройте worktree перед выходом: закрытые Orca восстанавливает закрытыми.
Часть 9. Браузер и Design Mode
У каждого worktree свой браузер — настоящий Chromium панелью внутри окна: адресная строка, история, devtools. Вкладки скоупятся по worktree, сессии сохраняются между запусками — куки можно импортировать из Chrome или Edge в один клик, чтобы не логиниться заново.
Полезные мелочи: hard reload с обходом кэша (для фронтенд-итераций), Cmd-F поиск по странице, Cmd-T новая вкладка, Cmd-Shift-T вернуть закрытую, полка загрузок, настраиваемый роутинг ссылок (открывать в Orca или в системном браузере, с инверсией по Shift), эмуляция вьюпорта через Chrome DevTools Protocol.
Design Mode
Формулировка из документации: Design Mode «turns the Orca browser into a pointer-to-code tool». Включаете тумблер в тулбаре браузера, курсор превращается в пипетку, наведение подсвечивает элемент под ним, клик — захватывает.
Что именно захватывается при клике:
- HTML элемента — внешняя структура плюс окружающий контекст;
- вычисленные CSS-свойства — цвета, шрифты, отступы;
- обрезанный скриншот именно этого элемента;
- файл-исходник и номер строки — доступно, когда в dev-режиме есть source maps.
Всё это уходит одним вложением в активный терминал агента. Дальше цикл: агент правит исходник → срабатывает hot-reload → кликаете снова, чтобы проверить.
Это, пожалуй, самая недооценённая функция Orca. Обычный способ объяснить агенту «вот эта кнопка выглядит криво» — писать абзац текста и надеяться. Здесь агент получает точный узел, его CSS и координату в исходнике. Дословно из доки: «the same context a human reviewer would want». Разница в количестве итераций примерно как между «где-то в районе логина» и стектрейсом.
Профили браузера
Профиль — это отдельная личность браузера: залогиненный пользователь, своя банка кук, свой user-agent.
Создание: Settings → Browser → Profiles → «Add profile». Настраиваются куки, user-agent и размеры вьюпорта. После создания профиль выбирается из тулбара браузера; все вкладки внутри панели наследуют активный профиль, и команды агента в браузере используют его же.
Каждый профиль хранит отдельные storage partitions для кук, local storage и кэша — данные между профилями не протекают.
Из CLI:
orca tab profile list --json
orca tab profile create --no-ua-spoof
Рекомендация из документации, неочевидная и полезная: для некоторых потоков авторизации лучше оставить нативный user-agent Electron, а не подделывать Chrome — совместимость выше. Подмена UA чаще ломает вход, чем помогает.
Отдельно стоит понимать, что это не антидетект-браузер: изоляция здесь про удобство работы с несколькими аккаунтами, а не про сопротивление фингерпринтингу. Про настоящие антидетекты у нас есть полное руководство по Octo Browser.
Часть 10. Терминал
Под капотом xterm.js — тот же движок, что в VS Code, — с доработками под агентные сценарии. Терминалы живут вкладками в общей системе сплитов; вкладки агентов показывают идентичность и живое состояние.
| Действие | Сочетание |
|---|---|
| Новая вкладка-терминал | Cmd-T |
| Новая вкладка-агент | Cmd-Alt-T (macOS) |
| Закрыть вкладку | Cmd-W |
| Сплит вправо | Cmd-\ |
| Сплит вниз | Cmd-Shift-\ |
| Плавающий терминал | Cmd+Option+A / Ctrl+Alt+A |
| Поиск по скроллбэку | Cmd-F |
Что стоит отметить отдельно:
- OSC 52 включён по умолчанию — буфер обмена работает из TUI поверх SSH: копирование из tmux и Neovim на удалённой машине.
- Copy Context в контекстном меню — выдаёт ограниченный кусок транскрипта из панели терминала (удобно кидать агенту кусок лога).
- Импорт тем: конфиг Ghostty (тема, шрифт, курсор) подхватывается при первом запуске; темы Warp сканируются из дефолтных каталогов и произвольных YAML-папок.
- Плавающий терминал — глобальный шелл поверх всего, не привязанный к активному worktree; удобен для оркестрации и фоновых прогонов, стартовый каталог и место в интерфейсе настраиваются.
- Quick Commands — сохранённые команды (
npm run dev) и переиспользуемые промпты для Claude/Codex, со скоупом Global или Project и группировкой по удалённым хостам. - Windows: настраиваемый шелл по умолчанию (PowerShell / cmd / WSL), выпадашка для разовых шеллов без смены дефолта, трансляция путей WSL.
- Раскладки: конвертация JIS-иены (¥) в бэкслеш и корейской воны (₩) в бэктик на macOS, поддержка kitty keyboard protocol для модификаторов.
Часть 11. Где на самом деле крутятся агенты: четыре режима
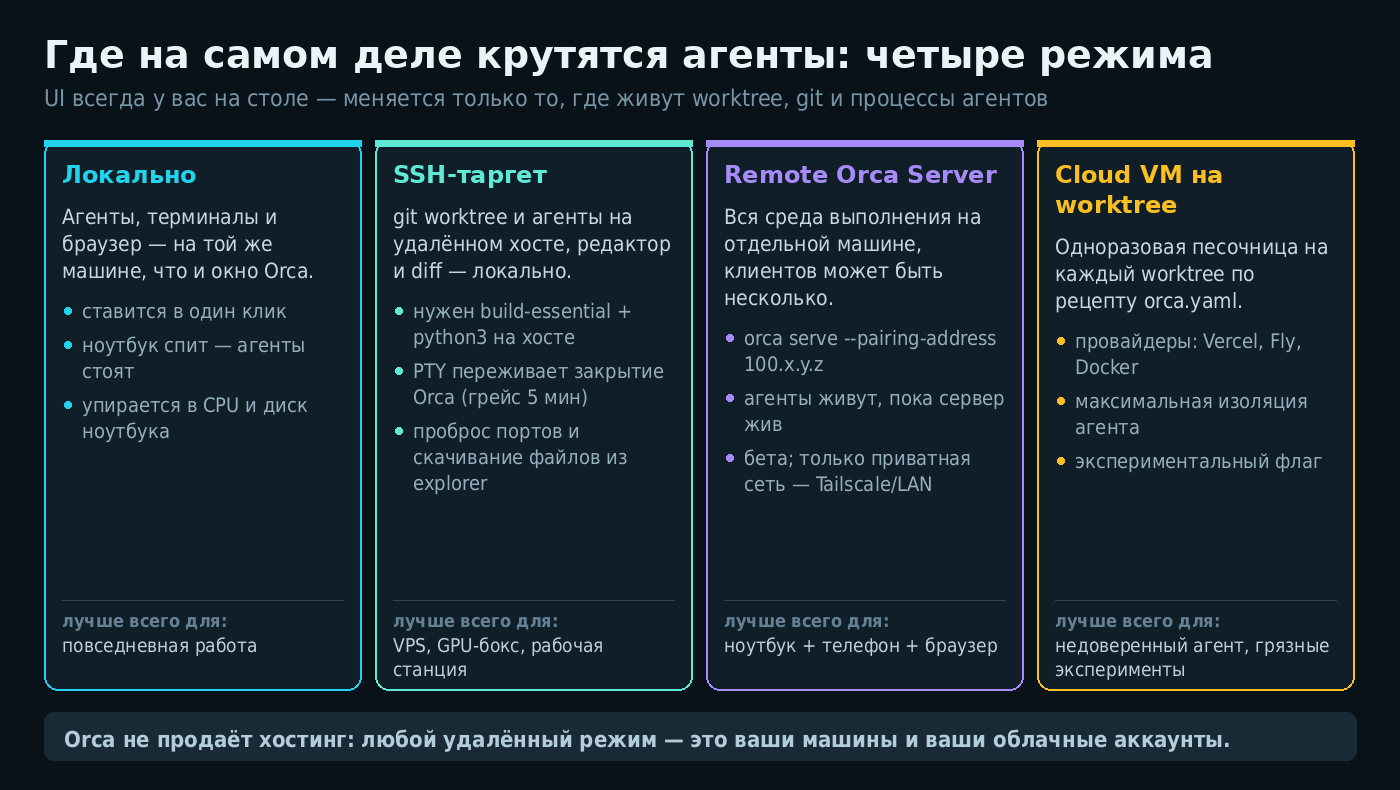
Схема на основе документации onorca.dev
| Режим | Где выполняется | Для чего |
|---|---|---|
| Local | ваш десктоп | повседневная разработка, быстрая итерация |
| SSH target | удалённый хост по SSH | dev-боксы, GPU-хосты, всегда включённый VPS |
| Remote Orca Server | машина с запущенным Orca или orca serve |
общий постоянный рантайм, мобильный доступ, автоматизация |
| Cloud VM | одноразовая VM/песочница на каждый воркспейс | изолированный эфемерный агентский compute |
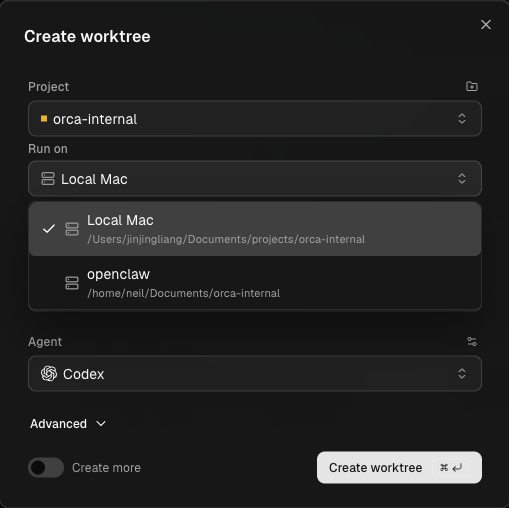
Скриншот Orca, onorca.dev
SSH-таргеты
Настройка: Settings → SSH → Add Target → хост, пользователь, порт, при необходимости identity-файл. Есть импорт из ~/.ssh/config, включая Include-файлы. Дальше при создании worktree выбираете таргет в поле «Run on» — git worktree создаётся на удалённой машине, агенты идут туда же.
Зависимости на удалённом хосте. Orca ставит туда нативный релей, поэтому нужны Node, сеть и тулчейн:
# Debian / Ubuntu
sudo apt-get install -y build-essential python3

# Fedora / RHEL
sudo dnf install -y make gcc gcc-c++ python3

# Alpine
sudo apk add build-base python3

# Arch
sudo pacman -S --needed base-devel python
Что даёт:
- Чипы состояния у удалённых worktree: зелёный — подключено, жёлтый — переподключается, красный — отключено.
- Живучесть PTY. Закрытие десктопного приложения больше не убивает удалённые сессии. При переподключении отсоединённые PTY возвращаются во вкладки в состоянии «attached» вместе со скроллбэком. Грейс-период по умолчанию — 5 минут, настраивается для каждого таргета отдельно.
- Переиспользование соединения включено по умолчанию (отключается, если политика запрещает мультиплексирование); в блоке Advanced Connection настраиваются прокси и jump host.
- Парольные фразы держатся в памяти на время сессии Orca и стираются при закрытии; в настройках SSH есть опция более длинного TTL.
- Вкладка Ports — правый сайдбар, шорткат
Cmd+Shift+I. Сканирует/proc/net/tcpна удалённой машине. Привилегированные удалённые порты автоматически перемаппятся локально: remote 80 → local 10080. Форварды переживают рестарты и переподключения. - Файлы: скачивание файлов и папок правым кликом в explorer, drag-drop с автозагрузкой на хост.
- Открытие удалённого worktree в VS Code через Remote-SSH.
Спецаутентификация: Kerberos/GSSAPI и аппаратные ключи FIDO2 (ed25519-sk, ecdsa-sk) идут через системный OpenSSH; обычные Ed25519, ECDSA и RSA — через встроенный транспорт Orca.
Remote Orca Server
Здесь вся среда выполнения переезжает на отдельную машину, а клиентов может быть несколько — ноутбук, телефон, браузер.
Рекомендуемый путь — десктопное приложение плюс Tailscale:
- На сервере: Settings → Remote Orca Servers → «Advertise this app as a server» → New Link.
- Выбрать Tailscale-адрес (обычно
100.x.y.z), сгенерировать access link. - На клиенте: Settings → Remote Orca Servers → Add Server, вставить ссылку.
Для машин без графики — headless-режим:
# базовый запуск
orca serve --pairing-address 100.64.1.20

# с фиксированным портом
orca serve --port 6768 --pairing-address 100.64.1.20

# с возможностью спарить телефон
orca serve --pairing-address 100.64.1.20 --mobile-pairing
Учётки агентов регистрируются прямо на сервере — клиентские логины туда не переезжают:
orca account add --agent claude
orca account add --agent codex
orca account list
Прямая цитата из документации: никогда не выставляйте порт Orca в публичный интернет. Только Tailscale, WireGuard, доверенный LAN или проброс через SSH. Ссылка спаривания — это пароль: каждый клиент получает отдельный отзываемый токен, активные гранты видны в разделе «Shared Server Access», отзываются иконкой корзины.
Режим помечен как бета. Учитывая, что на другом конце сидит агент с флагом --dangerously-skip-permissions, относиться к этому предупреждению стоит серьёзно.
Cloud VM на воркспейс
Экспериментальный режим, включается в Settings → Experimental → Cloud VM. Каждый worktree получает одноразовую песочницу, описанную рецептом из самого репозитория: файл orca.yaml плюс lifecycle-скрипты.
Провайдеры и цели, упомянутые в документации: Vercel Sandbox, Fly, Modal, SSH-хосты, Docker.
Настройку авторы предлагают делегировать агенту — буквально фразой:
Use the orca-per-workspace-env skill to set up a per-workspace environment for this repo
Это единственный из четырёх режимов, который даёт настоящую изоляцию агента от вашей машины. И принципиальная оговорка: Orca не продаёт управляемый хостинг — любой удалённый режим работает на ваших машинах и в ваших облачных аккаунтах.
Часть 12. CLI: где начинается настоящая автоматизация
CLI — не приложение к GUI, а полноценный интерфейс к работающему инстансу Orca. Регистрируется в Settings → General → Orca CLI. Почти каждая команда принимает --json.
Проверка, что всё на месте:
command -v orca
orca status --json
Селекторы
Половина команд принимает селектор объекта. Синтаксис единый:
| Селектор | Что означает |
|---|---|
active или current |
текущий worktree, из которого идёт вызов |
id:<repoId> |
явный идентификатор |
path:/abs/path/to/worktree |
путь на файловой системе |
branch:feature-name |
имя ветки |
issue:123 |
номер issue |
id:<repoId>::<absolute-worktree-path> |
удалённый (серверный) селектор для федеративных сценариев |
Базовое и репозитории
orca open --json
orca status --json
orca repo list --json
orca repo add --path /abs/path/to/repo --json
orca repo show --repo id:<repoId> --json
orca repo set-base-ref --repo id:<repoId> --ref origin/main --json
orca repo search-refs --repo id:<repoId> --query main --limit 10 --json
Worktree
orca worktree list --repo id:<repoId> --json
orca worktree ps --json
orca worktree current --json
orca worktree show --worktree active --json
orca worktree create --repo id:<repoId> --name fix-login --issue 123 --json
orca worktree create --name child-task --agent codex --prompt "..." --json
orca worktree rm --worktree id:<worktreeId> --force --json
Терминалы
Самое интересное, потому что отсюда агент может управлять другим агентом:
orca terminal list --worktree active --json
orca terminal show --terminal <handle> --json
orca terminal read --terminal <handle> --cursor <cursor> --limit 1000 --json
orca terminal send --terminal <handle> --text "continue" --enter --json
orca terminal wait --terminal <handle> --for tui-idle --timeout-ms 300000 --json
orca terminal create --worktree active --title "tests" --command "npm test" --json
orca terminal split --terminal <handle> --direction horizontal --command "npm run dev" --json
orca terminal rename --terminal <handle> --title "runner" --json
orca terminal switch --terminal <handle> --json
orca terminal close --terminal <handle> --json
Файлы
orca file open src/App.tsx --worktree active --json
orca file diff src/App.tsx --staged --worktree active --json
orca file open-changed --mode both --worktree active --json
Браузер
По сути встроенный Playwright для агента:
orca goto --url http://localhost:3000 --worktree active --json
orca snapshot --worktree active --json
orca click --element @e3 --worktree active --json
orca fill --element @e1 --value "email@example.com" --worktree active --json
orca wait --text "Welcome" --worktree active --json
orca screenshot --worktree active --json
orca full-screenshot --worktree active --json
orca pdf --worktree active --json
orca console --limit 50 --worktree active --json
orca network --limit 50 --worktree active --json
orca capture start --worktree active --json
orca set device --name "iPhone 12" --worktree active --json
orca tab list --worktree active --json
orca tab create --url http://localhost:3000 --worktree active --json
orca tab switch --index 1 --worktree active --json
Мобильные эмуляторы
iOS Simulator и Android через adb:
orca emulator list --worktree active --json
orca emulator attach "<device-name-or-udid>" --worktree active --json
orca emulator tap 0.5 0.7 --worktree active --json
orca emulator type "hello" --worktree active --json
orca emulator gesture '[{"type":"begin","x":0.5,"y":0.8},{"type":"move","x":0.5,"y":0.4},{"type":"end","x":0.5,"y":0.2}]' --worktree active --json
orca emulator button home --worktree active --json
orca emulator rotate landscape_left --worktree active --json
orca emulator exec --command "tap 0.5 0.7" --worktree active --json
orca emulator kill --worktree active --json
orca emulator shutdown --worktree active --json
Оркестрация: агент, который командует агентами
Отдельный слой для случаев, когда, цитируя документацию, «you need ownership, completion tracking, or a DAG». Включается в Settings → Experimental.
Сущности:
- Run — долгоживущее пространство имён и почтовый ящик координатора. Дословно: «Never schedules or places workers» — сам ничего не планирует.
- Task — единица работы со спецификацией, зависимостями и статусом:
pending,ready,dispatched,completed,failed,blocked. - Dispatch — одна попытка выполнения задачи на конкретном терминале, владеет жизненным циклом.
- Message — почта во входящем: типы
status,dispatch,worker_done,escalation,question,heartbeat. - Decision gate — вопрос координатора, блокирующий задачу до ответа.
Создание и запуск:
orca orchestration run-create --objective "Split checkout QA and summarize blockers" --json
orca orchestration task-create --spec "Audit billing settings for mobile layout" --task-title "Billing audit" --json

orca orchestration worker-start --task <taskId> --worktree current --agent codex --json
orca orchestration worker-start --task <taskId> --worktree new-child --name billing-audit --agent codex --setup run --json
orca orchestration worker-start --task <taskId> --worktree current --agent claude --model <opaque-model-id> --effort high --json
Ожидание и подтверждение сообщений:
orca orchestration check --wait --types worker_done,escalation,question --timeout-ms 900000 --json
orca orchestration check --ack <deliveryId> --wait --types worker_done,escalation,question --timeout-ms 900000 --json
Завершение работы воркером:
orca orchestration send \
  --type worker_done \
  --subject "Completed mobile audit" \
  --body "Fixed footer overlap; no follow-ups." \
  --task-id <taskId> \
  --dispatch-id <dispatchId> \
  --outcome succeeded \
  --files-modified "src/app/settings/Billing.tsx" \
  --json
Воркер обязан отправить worker_done ровно один раз и с обоими идентификаторами — задачи и диспатча. Если указать только task ID, устаревший ретрай закроет чужой диспатч, и вы получите задачу, помеченную выполненной, которую на самом деле никто не делал. Это самая коварная ошибка во всём оркестраторе, потому что она не падает, а тихо врёт.
Инспекция, остановка, ретраи:
orca orchestration worker-show --dispatch <dispatchId> --json
orca orchestration worker-read --dispatch <dispatchId> --limit 50 --json
orca orchestration worker-stop --dispatch <dispatchId> --json
orca orchestration worker-release --dispatch <dispatchId> --json
orca orchestration worker-retain --dispatch <dispatchId> --json
orca orchestration worker-start --task <taskId> --retry-of <dispatchId> --worktree current --agent codex --json
Групповая рассылка. Адреса: @all, @idle, @claude, @codex, @opencode, @gemini, @droid, @grok, @cursor, @worktree:<id>.
orca orchestration send --to @all --subject "Heads up" --body "Pausing dispatches for a review." --json
orca orchestration send --to @idle --subject "Anyone free?" --json
Вопрос координатору и шлюзы решений:
orca orchestration ask \
  --to <coordinatorHandle> \
  --question "Should I update the shared component or only this page?" \
  --options "shared,page-only" \
  --timeout-ms 600000 \
  --json

orca orchestration gate-create \
  --task <taskId> \
  --question "Merge the shared button change into the task branch?" \
  --options '["yes","no"]' \
  --json

orca orchestration gate-resolve --id <gateId> --resolution "yes" --json
Задачи и сброс состояния:
orca orchestration task-list --json
orca orchestration task-update --id <taskId> --status blocked --result '{"reason":"waiting on credentials"}' --json
orca orchestration dispatch-show --task <taskId> --preamble --json

orca orchestration reset --tasks --json
orca orchestration reset --messages --json
orca orchestration reset --all --json
Федеративные воркеры — задачи на разных машинах через флаг --on:
orca orchestration worker-start \
  --task <taskId> \
  --on windows \
  --worktree new-top-level \
  --repo <exact_remote_repo_selector> \
  --name remote-worker \
  --agent codex \
  --setup run \
  --json
Полный справочник по флагам агент может получить сам: orca skills get orchestration --full. Устаревшие orca orchestration run и run-stop больше не работают.
Чекпойнты worktree
У каждого worktree есть свободнотекстовое поле-комментарий — снимок того, что здесь сейчас происходит. Дословно из документации: «it’s the pattern we recommend for keeping human collaborators in the loop without forcing chat».
orca worktree set --worktree active \
  --comment "fix implemented; running integration tests" \
  --workspace-status in-progress \
  --json

orca worktree current --json
Статусы: todo, in-progress, in-review, completed плюс произвольные идентификаторы.
Рекомендуемый формат комментария — сначала действие и место, потом статус и следующий шаг. Пример прямо из доки:
added debounce to SearchBar onChange (src/components/SearchBar.tsx); ready for review—goal: reduce redundant API calls per #298
Хорошие моменты для чекпойнта: закончил кусок реализации, подтвердил или опроверг гипотезу, закончил ревью, упёрся в блокер (доступы, внешние зависимости), перешёл от исследования к правке.
Отдельная рекомендация из документации: перед перезаписью комментария сначала прочитайте текущий через orca worktree current --json. Там может лежать написанный человеком контекст с целями и ограничениями — агент, который его затрёт, не сломает код, но сломает коммуникацию.
Автоматизации по расписанию
orca automations create \
  --name "Weekday triage" \
  --trigger weekdays \
  --time 09:00 \
  --prompt "Triage new issues and summarize blockers" \
  --provider codex \
  --repo my-repo \
  --disabled \
  --json
| Флаг | Назначение |
|---|---|
--trigger |
пресеты hourly, daily, weekdays, weekly либо cron-выражение или строка RRULE |
--time |
время суток |
--timezone |
IANA-таймзона, по умолчанию таймзона рантайма |
--repo / --workspace / --project / --host |
где именно запускать |
--prompt / --provider |
что и каким агентом |
--precheck |
shell-команда-проба; ненулевой код — запуск пропускается и помечается как skipped |
--reuse-session |
продолжать в предыдущем терминале вместо нового на каждый запуск |
--missed-run-grace-minutes |
окно для пропущенных запусков |
--disabled |
создать выключенной |
--source-context '<json>' |
привязка task/provider к хосту или аккаунту; null очищает |
orca automations list --json
orca automations show <automationId> --json
orca automations edit <automationId> --enabled --json
orca automations edit <automationId> --fresh-session --json
orca automations run <automationId> --json
orca automations runs --id <automationId> --json
orca automations remove <automationId>
Рекомендованный порядок из документации: создавать с --disabled, проверять через list / show, прогонять руками через run, и только потом включать. Автоматизация, которая каждое утро в девять запускает агента с флагом полной автономии на живом репозитории, — не то, что стоит отлаживать в бою.
Computer Use
Управление нативными приложениями через дерево доступности, скриншоты и UI-действия. Статус — бета. Нужны разрешения Accessibility на всех платформах и дополнительно Screen Recording на macOS, выданные приложению Orca Computer Use.
orca status --json
orca computer permissions --json
orca computer capabilities --json
Основной цикл, дословно из доки: «read the app’s current state, act on a specific element, then re-read state to verify the result».
orca computer list-apps --json
orca computer get-app-state --app com.spotify.client --json
orca computer click --app com.spotify.client --element-index 42 --json
Приложение указывается тремя способами: bundle ID (предпочтительно, com.microsoft.edgemac), имя (Spotify, если однозначно) или PID (pid:<number>, крайний вариант). Для многооконных приложений — --window-id (стабильнее) либо --window-index.
Все действия:
orca computer click --app <app> --element-index <i> --json
orca computer set-value --app <app> --element-index <i> --value "text" --json
orca computer type-text --app <app> --text "text" --json
orca computer press-key --app <app> --key Return --json
orca computer hotkey --app <app> --key CmdOrCtrl+A --json
orca computer paste-text --app <app> --text "text" --json
orca computer scroll --app <app> --element-index <i> --direction down --json
orca computer drag --app <app> --from-x 100 --from-y 100 --to-x 300 --to-y 300 --json
orca computer perform-secondary-action --app <app> --element-index <i> --action <name> --json
Рекомендация авторов: предпочитать семантические действия (click, set-value, perform-secondary-action) сырому type-text и press-key — они бьют прямо в элемент доступности и переживают смену фокуса, чего клавиатурный ввод не умеет.
Чувствительные значения передаются через stdin, чтобы не светить их в истории шелла:
printf '%s' "$TEXT" | orca computer set-value \
  --app com.apple.Safari --element-index 7 --value-stdin --json
Скриншоты: get-app-state по умолчанию возвращает и дерево, и картинку. --json пишет байты на диск и возвращает путь в screenshot.path; --no-screenshot ускоряет и облегчает ответ; --restore-window разворачивает свёрнутое окно перед захватом.
Индексы элементов разрежены и привязаны к последнему снапшоту состояния. Их нельзя выдумывать и нельзя кэшировать: после любой навигации или перерисовки нужно заново звать get-app-state. Агент, который сэкономил один вызов и переиспользовал индекс, кликнет не туда — и вы даже не сразу поймёте, куда именно.
Скиллы
Orca поставляет пакеты-скиллы для агентов. Устроены гибридно: агент получает лёгкий стаб SKILL.md, который говорит ему три вещи — определить исполняемый CLI для этой сессии, загрузить полное руководство через orca skills get <topic> и предпочитать --json, не выдумывая флаги по памяти. Полное руководство подгружается из работающего CLI, поэтому флаги не расходятся с версией приложения.
| Скилл | Что даёт |
|---|---|
orca-cli |
worktree, терминалы, файлы, автоматизации, встроенный браузер |
orchestration |
runs, tasks, воркеры, сообщения, шлюзы решений |
computer-use |
нативные приложения через дерево доступности |
orca-linear |
чтение и запись тикетов Linear |
orca-emulator |
iOS Simulator |
orca-emulator-android |
Android через adb |
orca-per-workspace-env |
рецепты окружения на воркспейс |
# установка через общий менеджер скиллов
npx skills add https://github.com/stablyai/orca --skill orca-cli --global
npx skills update orca-cli orchestration computer-use --global

# то же самое из самой Orca (в том числе на headless-хостах)
orca skills list
orca skills get orca-cli
orca skills get orchestration --full
orca skills install --skill orca-cli --skill orchestration
orca skills install --skill orca-cli --agent claude-code,codex
orca skills install --all --dry-run
orca skills update --all
Флаги: --global (по умолчанию), --local (только для проекта), --agent <name>[,<name>…], --all, --dry-run, --json.
MCP-серверы регистрируются в Settings → Integrations → MCP и становятся доступны внутри тех агентских CLI, которые MCP поддерживают.
Часть 13. Мобильное приложение
Позиционирование честное и дословное: «The mobile app is intentionally not a full editor — it’s a remote control for the desktop you already have running». Это пульт, а не рабочее место.
Раздача: iOS — App Store и TestFlight (preview-канал); Android — APK на GitHub Releases (на момент написания версия 0.0.37). Статус — бета.
Пейринг по шагам:
- На десктопе открыть пейринг из меню аккаунта/статуса и получить одноразовый код.
- На телефоне выбрать Pair и вставить код (работает и deep link).
- Выбрать Orca Relay, если доступен (требует входа в аккаунт), либо адрес в локальной сети.
- В результате обмена создаётся device token для этого телефона.
Что умеет:
- Мониторинг: все worktree со статусом агента (working / done / waiting on input) по всем подключённым хостам; полное дерево файлов, включая вложенные пути; сессии агента в Chat UI или в сыром терминале.
- Терминал: чтение скроллбэка с рендерингом mermaid-диаграмм, выделение и копирование по долгому нажатию, ряд дополнительных клавиш с
Tab,Shift+Tabи режимом Live, зум текста 50–200 %, переключатели автодополнения и автокоррекции. - Взаимодействие с агентом: ответы текстом, фото, файлом или диктовкой; запуск сохранённых Quick Commands; переключение аккаунтов агентов и просмотр usage/rate-limit; расходование Codex rate-limit reset credits, если они есть.
- Воркспейсы: создание с телефона в режимах Smart, GitHub, Linear, GitLab, Branch, Name; правка отображаемого имени и адреса хоста без повторного пейринга; массовое закрытие вкладок долгим нажатием (пропускает «грязные» markdown-вкладки и запиненные).
- Ревью: просмотр изменений, стейджинг и анстейджинг, коммит.
- Браузер с переключателем Web / Mobile responsive.
- Push-уведомления по завершении агента.
Настройки: Settings → Chat UI → «Open sessions in Chat UI» (дефолт для устройства); Settings → Terminal → размер текста, автодополнение и автокоррекция.
Часть 14. Уведомления и лента активности
Уведомления. Когда агент переходит из working в idle, Orca срабатывает тремя способами сразу: системное уведомление, звук и чип на воркспейсе. В шапке постоянно висит колокольчик с непрочитанными по всем worktree — клик переносит к нужному worktree и панели; на macOS счётчик дублируется бейджем в Dock. Уведомление можно пометить непрочитанным правым кликом, если разбирать сейчас некогда.
Настройки — Settings → Notifications: включение и выключение отдельных категорий, свой звук на категорию (файл с диска или встроенный), громкость. Поддерживаемые форматы: MP3, WAV, OGG, M4A, AAC, FLAC. Один выбранный файл применяется ко всем доставляемым десктопным уведомлениям.
Лента активности (пункт Agents в сайдбаре, включён по умолчанию) — тредированная лента завершений агентов, блокирующих состояний, превью ответов и событий создания worktree по всем воркспейсам. Треды сгруппированы по статусу, работающие агенты закреплены сверху; на пункте висит бейдж непрочитанного. Фокус на фильтре — Cmd+F / Ctrl+F.
Оговорка, которая сэкономит вам десять минут недоумения: если фокус стоит во встроенном терминале, Cmd+F уходит терминалу (поиск по скроллбэку), а не фильтру ленты. Сначала кликните по ленте.
Часть 15. Настройки, приватность и телеметрия
Разделов настроек много; вот те, куда стоит зайти сразу после установки.
| Раздел | Ради чего |
|---|---|
| Agents → Agent Permissions | Yolo или Manual, плюс аргументы запуска на каждого агента. Самая важная галочка во всём приложении |
| Git & Source Control | резолвер base ref, подпись коммитов, автопереименование веток, Action recipes, GitHub API Budget |
| Repository | base ref, хуки, Worktree Shared Paths |
| General | регистрация Orca CLI, канал обновлений, Diff Word Wrap, Editor Word Wrap, зум интерфейса |
| Terminal | шрифт, тема, импорт Ghostty/Warp, OSC 52 |
| Notifications | категории, звуки, громкость, уведомления по чекам PR |
| Integrations | GitHub OAuth, Linear API, Jira, MCP-серверы |
| Browser | профили, зум по умолчанию, дефолты Design Mode, роутинг ссылок |
| Voice | диктовка: Parakeet TDT v3, Whisper, GPT-4o и другие модели, режимы Toggle/Hold |
| Artifacts | публикация файлов публичной ссылкой — по умолчанию выключено |
| SSH | таргеты, TTL парольных фраз, переиспользование соединения, Kerberos |
| Experimental | Agent Dashboard, гибернация, Chat UI, Cloud VM, оркестрация, плагины, Activity |
| Shortcuts | полная перенастройка кеймапа |
Телеметрия
Собирается: события жизненного цикла (открытие приложения), способ добавления репозитория и создания воркспейса — без имён и путей, тип запущенного агента и откуда — без промптов и вывода, широкие категории ошибок, изменения настроек из белого списка, статус согласия. К событию прикладываются версия Orca, тип ОС, архитектура CPU, канал релиза и случайный анонимный локальный идентификатор.
Явно не отправляются: пути к файлам, имена репозиториев, веток, URL, сообщения коммитов; промпты, ответы и содержимое терминала; сырые сообщения об ошибках и стектрейсы; аккаунты; IP-адреса и точная геолокация; любой свободный текст из полей ввода.
Отключается тремя способами:
# Settings → Privacy → Share anonymous usage data (выключить)
export DO_NOT_TRACK=1
export ORCA_TELEMETRY_DISABLED=1
Приёмник — PostHog Cloud (регион US).
Формулировки в этом разделе документации необычно конкретные — вместо «мы уважаем вашу приватность» перечислено, что именно уходит и что не уходит. Это заявление вендора, а не результат независимого аудита; но чтобы его проверить, достаточно поднять mitmproxy на своей машине — код открыт, поведение воспроизводимо.
Часть 16. Пять готовых рецептов из документации
Официальные пошаговые сценарии. Полезны тем, что показывают, как авторы сами предполагают этим пользоваться.
Рецепт 1. Гонка трёх агентов на одной задаче
- Создать три worktree от одной и той же исходной точки:
fix-bug,fix-bug-2,fix-bug-3. - Запустить в каждом своего агента — например, Claude Code, Codex и Cursor CLI.
- Отправить во все три идентичный промпт.
- Расставить панели так, чтобы видеть выполнение параллельно.
- Сравнить диффы, аннотировать лучший через Annotate AI Diff.
- Закоммитить выбранную реализацию и создать PR.
- Удалить проигравшие worktree одним кликом.
Рецепт 2. Как читать AI-дифф
- Открыть дифф в своём worktree.
j/k— идти по файлам. На каждом спрашивать себя три вещи: изменение вообще нужно? оно минимальное? оно в стиле кодовой базы?cна строке — замечание. Рекомендация из доки: писать полными предложениями.- «Send to agent» — отправить всё пачкой одним промптом.
- Следить за индикатором: жёлтый — ждёт, зелёный — работает.
- Открыть дифф заново, увидеть закреплённые комментарии, отметить решённые, добавить новые.
- Повторять, пока дифф не станет чистым, потом коммитить.
Тезис авторов: «Reviewing an AI diff well is the difference between shipping fast and shipping bugs».
Рецепт 3. Прыжки между десятью worktree
Cmd-J, ввести фрагмент имени задачи.Enter— перейти,Shift-Enter— открыть в сплите,Tab— фильтр по хосту или проекту.- Следить за цветными точками в сайдбаре: зелёная — агент активен, жёлтая — ждёт ввода.
- Чип Restart для перезапуска завершившихся агентов — особенно после сна системы.
- Ходить по завершённым задачам через уведомления.
- Удалять смёрженные worktree сразу — «один клик, и worktree, и ветка удаляются», иначе палитра распухает.
Рецепт 4. Починить UI-баг через Design Mode
- Открыть панель браузера в worktree, перейти на страницу с багом.
- Включить Design Mode.
- Кликнуть по сломанному элементу — он уходит в чат агента богатым вложением.
- Описать желаемое словами. Пример прямо из доки: «this padding is too tight, increase to match the cards above».
- Агент правит исходник, hot-reload обновляет страницу.
- Кликнуть снова для проверки, повторить при необходимости.
- Закоммитить, когда устраивает.
Рецепт 5. Удалённые worktree по SSH
Настройка: Settings → SSH → добавить хост → Test connection → убедиться, что на хосте есть git → добавить репозиторий, указав SSH-таргет как его локацию (либо открыть удалённую папку через файловый пикер).
Работа: создать worktree (Orca выполняет git worktree add удалённо) → запустить агента, он идёт на удалённый хост, а не на ваш ноутбук → править файлы inline с автосохранением на удалённую ФС → смотреть дифф, коммитить и пушить со своего ноутбука как обычно.
Ключевое свойство, дословно: «Laptop sleeps, Wi-Fi drops — the agent keeps running remotely. Orca reconnects and re-attaches the terminal. Nothing lost».
Часть 17. Что ломается
Агент не стартует — запустите его CLI руками в терминале, чтобы отделить проблему авторизации от проблемы Orca; проверьте, что бинарь в PATH (Settings → Agents); нажмите чип Restart на вкладке.
Дифф показывает не то — кнопка обновления на тулбаре диффа перечитывает worktree. Внешние операции git (rebase, reset) между обновлениями Orca не видит.
Не создаётся worktree — git fetch origin, если start-from ref не подтянут; удалите существующий worktree на эту ветку или возьмите новое имя.
orca: command not found — зарегистрируйте CLI в Settings → General → Orca CLI; на macOS убедитесь, что ~/.local/bin в PATH.
SSH-терминал не поднимается — на удалённой машине нужны Node и сеть для установки релея, а на Linux ещё и тулчейн (см. команды по дистрибутивам в части 11); после установки переподключитесь, чтобы пересобрались нативные модули.
Не скачивается папка по SSH — на системах без рекурсивного SFTP используйте tar / scp.
«Open in VS Code» неактивно — работает для SSH-worktree, но не для Remote Orca Server; в настройках должен стоять VS Code или Insiders, а не Cursor и не команда с несколькими аргументами.
Kerberos не пускает — проверьте билет через klist и наличие GSSAPIAuthentication yes в конфиге OpenSSH.
Браузер отвечает browser_no_tab — откройте вкладку через orca tab create --url ... или руками.
Тормоза — закройте лишние worktree и вкладки браузера.
Логи: Help → Open Logs. Обратная связь: Help → Send Feedback, GitHub Issues или Discord.
Про зрелость. В трекере на момент написания около 540 открытых issue, и по свежим заголовкам видно типовые зоны: рендеринг терминала (утечка CSI-u в Grok, ширина TUI в headless-режиме), разрешения macOS (повторный запрос TCC для SSH-агента), пруненные worktree, вызывающие циклический DaemonProtocolError, ложные уведомления о запросе подтверждения в Codex, невозможность одновременно работать с WSL- и Windows-проектами.
Это нормальная картина для продукта, который релизится каждый день. Но если вы ждёте от инструмента предсказуемости уровня VS Code — ставьте не на рабочий проект в первый же день.
Часть 18. Трезво: кому это нужно, а кому нет
Orca хорошо ложится на конкретный профиль: у вас есть подписки на двух-трёх агентов, вы уже упирались в то, что агенты дерутся за рабочую копию, и вы читаете диффы. В документации это сказано прямо: инструмент рассчитан на разработчиков, которые «actively review code changes, manage commits carefully, and maintain organized worktrees». Всё в интерфейсе — атрибуция, аннотации, визуальный staging, AI Action Recipes — заточено под ревью, а не под «сгенерируй мне приложение».
Не ложится, если: вы работаете с одним агентом на одной задаче (тогда весь оверхед worktree — чистые накладные расходы); у вас слабая машина (Electron плюс Chromium плюс N терминалов плюс N агентов — это гигабайты); вам нужна изоляция от агента, а не между агентами (тут нужен контейнер, а не worktree); вы ждёте полноценную IDE — авторы прямым текстом говорят, что тайпчекеры и линтеры запускаются руками в терминале.
И два вопроса, на которые стоит ответить себе честно.
Про лимиты. Параллельный запуск умножает расход. Если у вас один Claude Max, «гонка трёх агентов» из рецепта на практике превратится в один агент и два простаивающих worktree. Единственный честный выход — либо разные провайдеры на разные worktree (и тут пригодится рецепт с GLM из части 6), либо принять, что параллелизм у вас будет двойной, а не тройной.
Про доверие. Флаги полной автономии по умолчанию — это осознанный продуктовый выбор в пользу скорости. Он оправдан ровно до того момента, пока агент работает с вашим кодом на вашей машине по вашему промпту. Как только в цепочку попадает внешний контент — issue из чужого репозитория, страница из браузера, MCP-сервер, — модель угроз меняется, а флаг остаётся тем же. Свежее напоминание о том, как это выглядит на практике, — разбор про зашифрованные reasoning-блоки и хроника агента в инфраструктуре Hugging Face.
Если по обоим пунктам ответ «понимаю и принимаю» — Orca даёт лучшую на сегодня обвязку вокруг терминальных агентов, и она бесплатная и открытая. Если нет — начните с одного агента в контейнере, а параллелизм добавляйте потом.
Источники
- Официальная документация Orca — разделы install, model (worktrees, tabs-panes-splits, agents-sessions, session-restore, quick-open), agents (supported, claude-code, codex, codex-hot-swap, cursor-cli, glm-agent, native-chat, session-history, hibernation, usage-tracking, hooks-memory), review (diff-viewer, annotate-ai-diff, attribution, commit-push, github, linear, jira), editing (monaco, markdown, viewers, file-explorer), browser (overview, design-mode, profiles), terminal, ways-to-run, ssh, remote-servers, cli (overview, reference, orchestration, automations, computer-use, worktree-checkpoints, skills), mobile, notifications, activity, recipes, settings, telemetry, troubleshooting, github-errors
- Репозиторий stablyai/orca (MIT)
- Чейнджлог Orca
- Профиль Stably AI (Orca) на Y Combinator
- Трекер issue проекта
Скриншоты и видео интерфейса — официальные материалы проекта с onorca.dev; схемы модели и режимов запуска — авторские.
Кто уже гонял параллельных агентов — на чём остановились: Orca, голые git worktree со скриптами, или отдельные контейнеры на задачу? И главный вопрос по существу: у кого-нибудь «гонка трёх агентов» реально окупилась по лимитам, или на практике всё равно работает один, а два висят для галочки?