Всем привет! Решил создавать отдельные тематические темы под задачи, с которыми сталкиваюсь, и делиться тем, как я их решаю. В этой статье разберёмся, как подключить сервер Proxmox 8 к Wi-Fi-сети с помощью пакетов wpa_supplicant и wireless-tools.
Сейчас у меня сервер подключён по кабелю, протянутому через полквартиры, — иначе никак ни зайти, ни настроить. А учитывая, что у меня куплен Wi-Fi-адаптер в слот PCIe, глупо им не пользоваться. Итак, ставим Wi-Fi на Proxmox 8 — это несложно.
Устанавливаем пакеты для работы с Wi-Fi
Первым делом нам нужно установить два пакета.
Пакет wpasupplicant
Пакет wpasupplicant является инструментом для подключения к защищённым Wi-Fi-сетям с использованием протокола WPA/WPA2. Он предоставляет команды и утилиты, которые позволяют вашему устройству автоматически аутентифицироваться и устанавливать безопасное соединение с точкой доступа Wi-Fi, которая использует шифрование WPA или WPA2.
Когда вы устанавливаете пакет wpasupplicant, вы получаете доступ к следующим возможностям:
-
Подключение к защищённым Wi-Fi-сетям. Пакет предлагает команды, такие как
wpa_supplicant, которые позволяют вам подключиться к Wi-Fi-сети, требующей аутентификации по протоколу WPA/WPA2. Вы можете настроить параметры подключения, такие как SSID (имя сети), пароль и тип шифрования. -
Управление настройками Wi-Fi. Также пакет предоставляет утилиты, которые позволяют вам управлять настройками Wi-Fi: сканировать доступные сети, отключаться и подключаться к определённой сети и т. д. Это полезно, если вы хотите настроить автоматическое подключение к определённой сети или изменить настройки вашего подключения.
В общем, установка пакета wpasupplicant необходима, если вы планируете подключаться к защищённым Wi-Fi-сетям с шифрованием WPA/WPA2. Устанавливаем:
apt-get install -y wpasupplicant
Пакет wireless-tools
Пакет wireless-tools предоставляет различные утилиты и инструменты для управления беспроводными сетями в Linux. Когда вы устанавливаете этот пакет, вы получаете доступ к следующим возможностям:
-
Управление беспроводными интерфейсами. Wireless-tools предоставляет утилиту
iwconfig, которая позволяет вам просматривать и настраивать параметры беспроводных интерфейсов, такие как уровень сигнала, частота, мощность передатчика и другие. -
Сканирование беспроводных сетей. С помощью утилиты
iwlistвы можете сканировать доступные беспроводные сети, получать информацию о сети — имя (SSID), уровень сигнала, тип шифрования и т. д. Это полезно, если вы хотите найти доступные сети или проверить качество сигнала. -
Конфигурация беспроводных сетей. Wireless-tools также предоставляет утилиту
iwpriv, которая позволяет настраивать дополнительные параметры беспроводных сетей, такие как режим работы, фильтрация MAC-адресов и другие. -
Управление соединениями. Утилита
iwconfigпозволяет установить соединение Wi-Fi и управлять им: подключаться к сети, отключаться от неё и настраивать параметры соединения.
В целом, установка пакета wireless-tools полезна, если вы планируете работать с беспроводными сетями в Linux. Он предоставляет удобные инструменты для управления беспроводными интерфейсами, сканирования сетей и настройки параметров соединения. Устанавливаем:
apt-get install wireless-tools
Определяем Wi-Fi-интерфейс
Узнаём конфигурацию по сетям — для этого выполним команду:
iwconfig
Получим примерно такой вывод:
Полный вывод команды iwconfig
root@openode:~# iwconfig
lo        no wireless extensions.

enp8s0    no wireless extensions.

enp9s0    no wireless extensions.

enp12s0   no wireless extensions.

wls6      IEEE 802.11  ESSID:off/any
          Mode:Managed  Access Point: Not-Associated   Tx-Power=-2147483648 dBm
          Retry short limit:7   RTS thr:off   Fragment thr:off
          Encryption key:off
          Power Management:on

vmbr0     no wireless extensions.

tap100i0  no wireless extensions.

docker0   no wireless extensions.

br-49e5b2a6e981  no wireless extensions.

veth990e3c3  no wireless extensions.

vethad03e47  no wireless extensions.

br-ba8c03b9be06  no wireless extensions.

veth1b7e029  no wireless extensions.
Из этого понимаем, что нас интересует интерфейс связи wls6 (в моём случае).
Настраиваем сетевые интерфейсы
Далее идём редактировать файл /etc/network/interfaces:
nano /etc/network/interfaces
У меня он выглядит вот так:
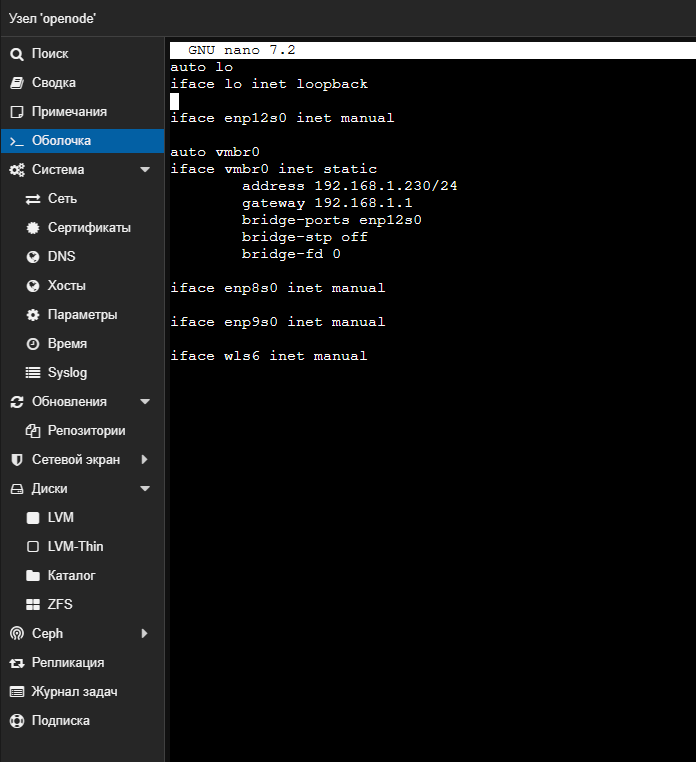
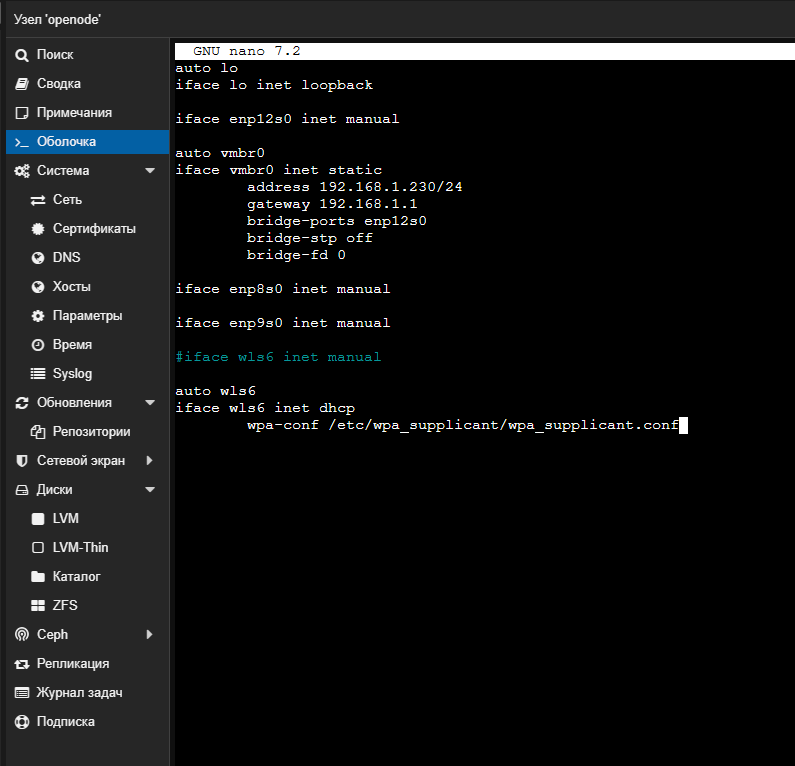
Видим, что про wls6 здесь нет ничего. Исправляем: дописываем текст ниже и комментируем ненужную (изменяемую) строку:
auto wls6
iface wls6 inet dhcp
        wpa-conf /etc/wpa_supplicant/wpa_supplicant.conf
Настраиваем wpa_supplicant
Теперь редактируем файл с параметрами подключения /etc/wpa_supplicant/wpa_supplicant.conf:
nano /etc/wpa_supplicant/wpa_supplicant.conf
Вставляем такое содержимое, заменив название сети и пароль на свои:
country=RU
ctrl_interface=DIR=/var/run/wpa_supplicant GROUP=netdev
update_config=1

network={
ssid="your ssid"
psk="your wifi password"
scan_ssid=1
}
Сохраняем файл, выходим и перезапускаем службу:
sudo systemctl restart networking
Проверяем подключение
Кидаем в консоль команду ip a и видим, что у нас получилось подключиться к Wi-Fi:
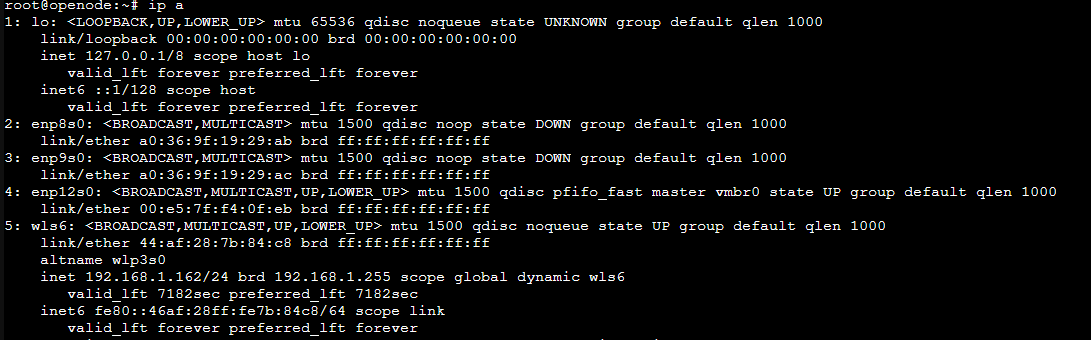
Отлично!
Настраиваем автозагрузку служб
Включаем службу в автозагрузку при перезапуске:
systemctl enable wpa_supplicant.service
Вам также необходимо запускать dhclient во время загрузки, чтобы получать частный IP-адрес от вашего DHCP-сервера. Этого можно достичь, создав сервисный юнит systemd для dhclient:
nano /etc/systemd/system/dhclient.service
Вставляем туда код ниже, не забыв заменить интерфейс:
/etc/systemd/system/dhclient.service *
[Unit]
Description= DHCP Client
Before=network.target
After=wpa_supplicant.service
[Service]
Type=forking
ExecStart=/sbin/dhclient wls6 -v
ExecStop=/sbin/dhclient wls6 -r
Restart=always

[Install]
WantedBy=multi-user.target
Теперь перезапускаем сервис:
systemctl restart wpa_supplicant.service
И ещё раз перезапускаем сеть:
systemctl restart networking
Теперь веб-интерфейс доступен по адресу: 192.168.1.162:8006.
Настраиваем сетевой мост
Но на этом ещё не всё. Для правильности всех настроек нам нужно провалиться в параметры сети:
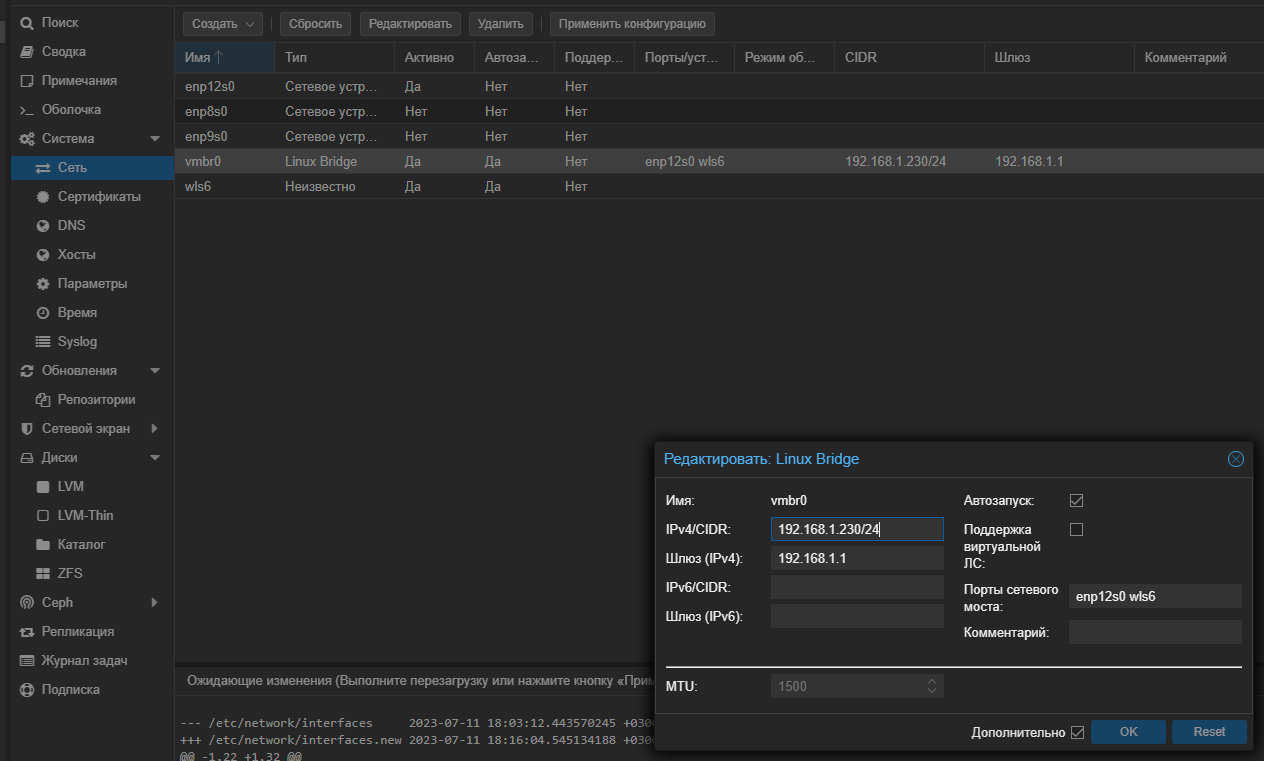
И указать в портах сетевого моста интерфейс wls6.
Чтобы применить изменения, нужно перезапустить наш узел, то есть сервер. Узлом он называется потому, что мы можем собрать в одной сети несколько серверов в кластер.
Нужная кнопка находится сверху при активном узле:

Нерешённая проблема
Но теперь, если отключить проводную сеть, пропадает весь доступ… Получается, что по Wi-Fi сеть не держится. Пока я не смог решить эту проблему  Хоть и перенастроил bridge, и оставил там только шлюзы для Wi-Fi…
Если кто-то сталкивался с подобным — подскажите 
UPD: вероятная причина — в отсутствии драйверов для моей сетевой карты TP-Link T5E: нет поддержки Linux
Статья впервые опубликована 11.07.2023 на openode.xyz; перенесена и обновлена 04.08.2026.